Sunday, March 31, 2013

Happy Easter!

Happy Easter everyone! 

This is such a great day to celebrate.  Sunday mornings are crazy in my house (yours too?).  But I refuse to let the craziness distract me from celebrating what Jesus did for me.

And he lived, died, and rose again for you as well.

We still give our kids baskets full of toys and candy and hide eggs for them to find (from us, not the Easter bunny). 

And we also dress up and force the kids to take family pictures.  This year Nora was the one who couldn't get on board with the whole family picture thing.  We got two decent family shots:


Just to keep it honest, our family pictures also included this:


What you can't see in these pictures (besides the battle to get Griffin in a tie and the arguments with Nora about her attitude...) are the super fun nail decals I put on my fingernails:


Ok, enough with the girly details.

Lastly, here's one of my all time favorite Christian songs, and it's very fitting for Easter.


Don't ever forget that God loves YOU so much that he sacrificed his son for you.

Now I'm off to witness my niece being baptized.  How cool is that??

Happy Easter!

Jessica

Friday, March 29, 2013

Coloring Easter Eggs

This evening we enjoyed our yearly tradition of coloring Easter eggs with Jared's dad.  It's always such a fun event with the kids (after I let go of my fear of messes).

This year was just as fun as anticipated!

I always buy clearance egg coloring kits after Easter and store them until the next year.  I also save the coloring cups, utensils for moving the eggs, and the little white crayons to reuse every year.

I've learned a few tricks along the way.  For instance, I double up the color tablets for classic colors (neon colors don't need a partner).


Sometimes it's hard to tell what color those little tablets are.  The easiest way to figure it out is to wet a paper towel and rub it on the tablet.  You can easily see the color on the paper towel.


I test the tablets and do my best to match the dye color to the cup color to make it easier to identify colors when we're all at the table coloring Easter eggs.  I use vinegar to dissolve the tablets, but I use water for the pinks (as recommended on the kit instructions).

I also have at least 3 cups of each color so we don't waste much time waiting for a color to become available.  I cover the table with layers and layers of newspapers to absorb inevitable spills.

This year Griffin ended up making most of his eggs brown.  That made a few cups of dye brown as well.

We really had tons of fun coloring Easter eggs together.  It's good old fashioned family time that warms my heart.


I was giving Nora pointers.  Apparently, we were having a Crazy Hair contest.  What can I say--I was cleaning and cooking all day.


Jared and his finished eggs

Grandpa Dan and his eggs

Me and my eggs

Nolan and his eggs

Griffin and his eggs

Nora and her eggs

Our family's finished eggs

We finished our evening with some Jello eggs. :)

Happy Easter everyone!

Jessica

Fifty!

I have officially lost 50 pounds!

50.4 lbs. to be exact.  :)

I started this journey January 1 of last year.  I lost 45 lbs. by mid-April and kept it off until November. 

Then I decided to let myself go for the holidays, and I ended up putting about 6 lbs. back on.  Boo.

So I started back up January 1 of this year.  I did all the same things that worked so well last year, but they just didn't work as quickly this year.  I pressed on and eventually (slowly) worked off those 6 extra pounds.  And now I've worked off another 5 lbs. to bring my grand total to just over 50 lbs.

My five-year-old son Griffin weighs about 47 pounds, so I've lost a Griffin's worth of weight.  It was like the old me was carrying him around all the time.  Think about that!

Now if I could just get my body to start listening to me about where I would like the weight to drop from, that would be great. 

And if there's a plastic surgeon who would like to donate his/her time and resources to do a little something about all this saggy skin, I'd be ever so grateful.  I know; you didn't need that visual. 

I'm still working on my relationship with food.  I'm still working on my issues with stomach pain and nausea.  I still don't love exercise. 

I also still have a little hiccup with my body image.  I think my mental image of what I look like is fixed at a certain weight/shape.  That meant that I never realized just how large (er, extra large) I had become.  It also means that I still don't see myself as "small" as I currently am (well, smaller than I used to be).  My mental image of myself is somewhere between the old and new. 

I can wear a smaller size of clothing, but I'm still terrified of the impending warmer weather that will bring about more exposed skin. 

I'm still trying to make peace with cellulite and stretch marks.  Some people can work their way back to a bikini body, but some of us have to wear the evidence of past struggles with food and extra weight.  I used to say that my extra weight was like my scarlet letter, telling the world that I had a not-so-secret affair with food.  Now I feel like I can hide that evidence in certain clothes, but I'll never fool anyone into thinking I've always been this size.

Our focus/attention/efforts are slowly shifting toward moving our family to a slightly bigger house (with a second bathroom!).  We are seeking God's guidance for each step of this new journey.  I have concerns about maintaining healthy eating and exercise during a stressful moving process.  Meanwhile, I know that in just a couple months, we will be on a vacation where I'll be wearing a swim suit.  That thought makes me want to either exercise like a maniac or throw in the towel and eat cookie dough because I know I'll never look beach-ready.

I know that's a whole lot of honesty for a Friday afternoon.  I'm just keepin' it real.  I'm super excited about the success of losing 50 pounds.  I'm still a work in progress.  As a perfectionist, I always chose not to even try to work on my body because I was afraid of failing.  Now that people in my world know that I've worked to lose weight, they would also all know if I give up and go back to my old ways.  It's accountability as well as pressure.  Accountability can keep me on the right path.  Pressure can push me to giving up. 

This is the point where I invite God to fill in the gaps of my own weaknesses and make something beautiful from my scars.

I fail, but he doesn't.  I give up; he never does.  I make wrong choices, and he weaves them together in a way that is good.  Even my relationship with food and my own body falls under his jurisdiction.

"And I am certain that God, who began the good work within you, will continue his work until it is finally finished on the day when Christ Jesus returns. "  Philippians 1:6 (NLT)

Jessica

Thursday, March 28, 2013

Easter Ideas

I honestly have not spent one minute searching for Easter ideas this year.  I have stumbled across a few cute ideas on Pinterest, but that's about it.

We are doing standard run-of-the-mill Easter baskets for our kids.  We do have a family lunch on Sunday, and I'm just taking a couple desserts that are yummy go-to recipes and not anything wildly creative.

So, here are my measly few ideas for this year, followed by links to my roundups from last year.


I couldn't find the source for this picture, but you can get the idea.  They are strawberries dipped in colored white chocolate to look like carrots.  So cute!

And now here are links to last year's Easter ideas in case you missed them:


Happy almost Easter!

Jessica

Baked Spaghetti with Zucchini

You may have noticed that my blog has been a little more food-focused rather than craft-focused lately.  That's because this blog reflects my ever-changing life.  I haven't had much time for crafts lately, and the ones I've done wouldn't be all that interesting to the general public.

I'm still trying to lose a little more weight, and I'm still trying to work with my diet to appease my finicky stomach.

I was getting frustrated feeling deprived and thinking about all the foods that I can't have.  So I decided to start focusing on foods that I can eat.  I'm trying new foods and finding ways to work in more vegetables.  Since we've been a corn and green beans kind of family, this is challenging for all of us.

I figure the more variety I put in my diet, the greater my chances of getting the vitamins and nutrients that my body needs, and the less chance I have of experiencing diet burnout (been there).

My family likes zucchini.  Well, most of us do.  I have a zucchini pasta bake that is regularly in our dinner rotation.  But I still wanted to try this recipe that I found through FitnessMagazine.com.


Click here for the full recipe.

I liked that I could prep this recipe ahead of time and then just throw it in the oven to bake before dinner.  I did the prep work while the kids ate lunch (I waited and ate my lunch in peace during their nap time!). 

This recipe was tasty and received good reviews from all family members.  {Of course, Griffin ate a deconstructed version since he doesn't eat spaghetti sauce.}

Jared didn't even notice that I used wheat spaghetti noodles.

The best part:  no one even noticed the zucchini because it was shredded!  So if you want to sneak veggies into your kiddos, this recipe is a great way to do it.  I didn't peel my zucchini first, and I could see the dark green speckles amongst the noodles, but my kids didn't spot them.

This isn't a super low fat recipe, but you can make a few alterations if you want.  As I mentioned, I used wheat spaghetti.  I also used Prego Light Smart spaghetti sauce.  You could use fat-free mozzarella, but I just used what I had on hand.  I didn't put any meat in mine, but you could use a lean meat such as ground turkey or turkey pepperoni.  For the egg mixture that you pour over the noodle casserole, I used 3 eggs instead of four and increased the milk to 2/3 cup.  You could even use egg substitute.

I just wanted to pass along a great recipe to help infuse some veggies into your dinner!

Jessica

Tuesday, March 26, 2013

Simon Says

I discovered a very simple but super fun game to play in our house:  Simon Says.

It's a classic, and I had just never thought to play it with my kids.  I think I associate Simon Says with a large group of people (like a class or Vacation Bible School).

I played it with Griffin and Nora on Wednesday, and we had so much fun.

Then Thursday night after dinner, Griffin asked if we could play a game together as a family.  I couldn't believe that he requested family time!  Talk about a fun first!

We considered our many board games:  Candyland, Sorry, Trouble, Operation, Monopoly, etc.  All of these games are only for four players, and ours is a family of five.  So Griffin suggested that we play a family game of Simon Says.

He insisted that we gather in the living room because that's where I had played it with the two littlest kids the day before.  We took turns being Simon, and we fully participated, even with somewhat ridiculous things that Simon wanted us to do.

We had SO much fun together as a family!  Here are some of my favorite moments:
  • Griffin, as Simon, directed us to name the books of the Bible.  (We only named the New Testament because none of us have the Old Testament memorized!)  He also ordered us to recite a Bible verse.
  • Simon said to skip around the house, and I laughed so hard that I cried when Jared took a full minute to remember how to skip.
  • When I was Simon, I told everyone to rub their bellies and pat their heads at the same time.  I nearly wet my pants watching them try to do it!
  • Nora did everything she was told to do, whether Simon said or not.
  • When Jared was Simon, he told all the kids to kiss me.  :)
Just in case you've never thought of it before, try playing Simon Says with your kids!

Jessica

Saturday, March 23, 2013

Spaghetti Squash "Lasagna"


Ok, so this is a very loose interpretation of a lasagna, but I don't know what else to call it.

Jared and I have really been liking spaghetti squash lately.  I always make it into a side dish, but this time I wanted to use it in a main dish.

I learned how to cook spaghetti squash using this tutorial.

I used to use a skewer to poke the holes in the squash, but now I just use a knife.  I'm sure I look a bit crazy stabbing a squash repeatedly.


I actually baked my spaghetti squash the day before I needed it.  I removed the seeds and scraped out the strands of squash, and I just put the squash strands in the fridge overnight until I needed them the next evening.

Ingredients needed:  spaghetti sauce, shredded mozzarella, cooked spaghetti squash, and meat of your choice (not shown in this picture)

I took a very easy route for the meat.  I had some Schwan's LiveSmart turkey meatballs on hand.  They are fully cooked and frozen, so I just had to heat them up.


I microwaved the meatballs for 1.5 minutes and then cut each meatball into quarters.


You could brown some ground beef, ground turkey, or ground chicken for your meat layer.  I was lucky enough to have a healthy and easy option on hand.

I assembled my lasagna in a 2.5 quart casserole dish that I sprayed lightly with non-stick spray.

I coated the bottom of the dish with a very thin layer of spaghetti sauce.  Then I spread about half of my spaghetti squash over the sauce. (Was that sentence confusing to anyone else?)


I spread all of the meatball pieces over the squash.  (You can divide your meat into two layers.  I just only had enough meatballs for one meat layer.)


I accidentally switched the next two layers.  I did cheese and then sauce.  I probably should have done sauce and then cheese.  But this is proof that you can't really mess this up too badly.


Next was the rest of my squash.


Then sauce.  (If you have a second meat layer, add it before this sauce layer.)


And finally, more cheese.


I baked my "lasagna" at 375 degrees for 20-30 minutes.  Everything was already fully cooked, so I just needed to heat it through and melt the cheese on top.  I baked mine uncovered, but you could also cover with foil to help it heat faster.  Mine probably took a little extra time because all my ingredients were refrigerated to begin with.

Ready to eat:


My notes:
  • Spaghetti squash has a lot of moisture.  You can place your cooked squash in a clean kitchen towel and wring out the extra liquid.  I didn't want to go to that trouble, so I just used the least amount of spaghetti sauce necessary to limit the overall liquid.
  • Your mouth will not be tricked into thinking the squash is actual pasta.  This isn't supposed to taste exactly like regular lasagna (or, technically, baked spaghetti).  This is just a lower carb dinner option, and it's also a way to eat more veggies.  I do think once you get used to meals like this in your regular dinner rotation, you will enjoy them for what they are.
  • As I already mentioned, feel free to make substitutions.  Use your favorite spaghetti sauce.  Use fat-free cheese or some other cheese you prefer over mozzarella.  Add Italian sausage for flavor or a lean ground meat for a lighter protein option.
Enjoy!

Jessica

Cinnamon Roll Sheep

My Sunday school class is studying a series entitled "I Am."  Each week we study a passage from John in which Jesus makes an "I am" statement.

I wanted to do something special each week to help the class remember the lesson.  The first week, "I am the bread of life," I made homemade Avanti's bread rolls.

The second week, "I am the light of the world, " I emailed everyone a video of Nora singing "This Little Light of Mine."

The third week, "I am the gate," I put up a baby gate at the entrance to our classroom and made everyone step over it to enter class.

This week's lesson is "I am the good shepherd."  I couldn't really find any shepherd recipes (besides Shepherd's Pie), but I found lots of cute sheep recipes.  I finally decided to make a sheep out of cinnamon rolls.

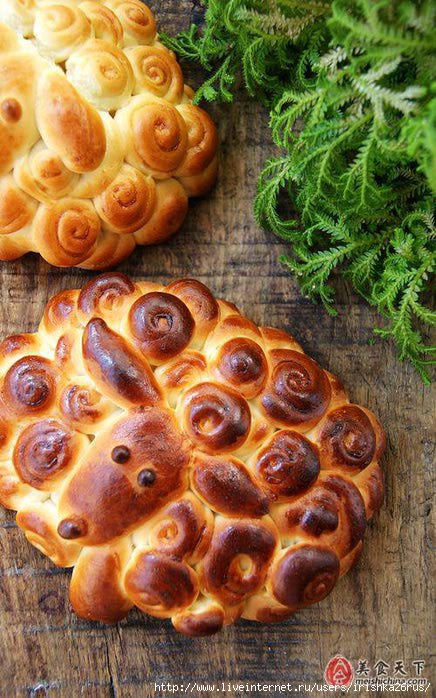
This was my inspiration photo:


I can't tell you the name of the source because not a word of it is in English.  You can visit the site here.

From what I can tell, the inspiration photo is a bread recipe (not cinnamon rolls).  The swirls reminded me of cinnamon rolls, and I thought they would be tasty for a Sunday morning.

I was worried about stacking my rolls and baking them in one big clump because the center might not get baked through.  So I decided to bake individual cinnamon rolls and stack them after they're baked.

I started by making the dough.  My go-to recipe for cinnamon rolls is Everyday Cinnamon Rolls from Our Best Bites.  I adjust the filling ingredients to be 3/4 cup packed brown sugar, 1 tablespoon cinnamon, and 3/4 butter (softened).  The original recipe just made way too much filling and it oozed out and soaked the cinnamon rolls in a buttery bath.  Also note that this recipe uses Rapid Rise yeast instead of the usual Active Dry yeast.  I like it because it takes less time than a traditional recipe.

When the dough was ready to be shaped, I cut off a chunk of dough for the sheep's face and two little pieces for the ears (I divided that smaller piece of dough in two).  I ultimately decided not to try to put cinnamon filling in the head.


To make the sheep's head, I first rolled the larger piece of dough into a ball.  Then I divided the smaller piece in two and set the ears up against the head.


Then I shaped the face a bit.


Then I rolled out the dough for the cinnamon rolls.  Normally, I roll it out about 12" x 14" to make normal size rolls.  For this project, I wanted lots of mini rolls, so I rolled out my dough to be narrow and long.


I spread my filling over the dough.


Then I rolled it up.


I cut it into rolls about 3/4" thick.


Normally, I put the rolls in a 9x13 pan for rising and baking.  However, when they touch as they rise and bake, they become more square in shape.  I wanted nice round little swirls, so I put my rolls on cookie sheets, making sure they wouldn't touch.


I originally put the sheep head on one of the pans with rolls, but then I realized it would likely need to bake longer, so I moved it to its own pan.  I only have two Silpat mats, so I just put parchment paper on the third pan.  I should have wiped away those blobs of cinnamon filling after I moved the rolls off that pan.  Oh well.


I let the rolls rise for 30 minutes and then baked at 350 for about 13 minutes.  I checked after 10, moved the pans around, and just kept checking them.

Even though I had adjusted the filling like I usually do, it still oozed out of all the rolls.  Since the filling oozed out, the rolls didn't stay tightly rolled.  I adjusted them by hand as best as I could.


You see why I should have wiped that cinnamon filling off?  It burned on the paper.

At this point I thought, "What have I gotten myself into?  Why do I always do this to myself?"  I suddenly wished I had made cupcakes or something else.  I was very frustrated that my work had not produced cute little swirled rolls.

{By the way, I promise these rolls have worked every time I've made them normal size and baked in a 9x13.}

I let everything cool.

I decided to lay out my sheep with the head off to one side and the body made of stacked cinnamon rolls.  I used my cupcake carrier (without the cupcake trays) so I could put a lid on the cinnamon rolls overnight and easily transport them to church.

I looked at my inspiration photo as well as this picture to help me:

How to Draw a Cartoon Sheep

I started with the head and one layer of rolls.


Then I added two more layers of cinnamon rolls.  This was my "dry fit" run.


I wasn't thrilled with the overall layout/shape, but I had to make it fit on what I had (the bottom of the cupcake carrier).  I had a mental hissy fit about the shape not being right.  And then I got over it.

I mixed up a quick icing.  I used powdered sugar, milk, and clear vanilla so the icing would remain white.


I repeated the roll layering process, this time icing the rolls in between.


I added more powdered sugar to the remaining icing until I had a very thick, crumbly mixture.  I shaped it by hand to create two large discs for the eyes and two little dots for the nose.


I used two jumbo chocolate chips for the pupils of the eyes.


I looked at my little sheep.  I looked at my pictures.  I just couldn't figure out how to make it look better.  I finally decided to add a little mouth.


It still didn't seem quite right.  I felt my frustration rising.  Then I realized I was being ridiculous over a treat for my Sunday school class.  It's not perfect.  But it's good enough. 

So here is my cinnamon roll sheep:


"I am the good shepherd; I know my sheep and my sheep know me--just as the Father knows me and I know the Father--and I lay down my life for the sheep."  John 10:14-15

Jessica