
This year we wanted to continue our pursuit of creativity, and we decided to make snow cone cupcakes. Here's my entry for this year's contest:


I was inspired by these cupcakes on Bakerella:
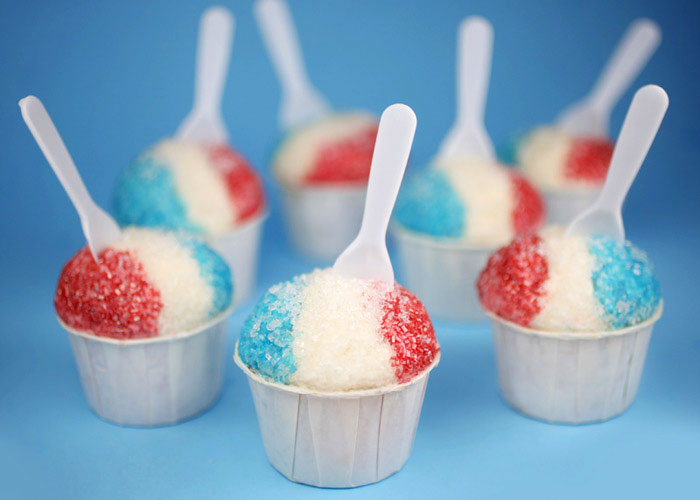
I wanted to make the actual cupcakes have three colors of batter in vertical stripes (rather than stacked horizontally), just as Bakerella did. However, I also wanted each color of batter and frosting to have its own flavor. I tried both the little paper cups she used and also some paper cones. I added straws and spoons to finish off the look.
I decided to do a trial run of these cupcakes a few weeks before the competition so I could fine-tune what I wanted to do. I'm sharing with you a detailed account of all that I did and learned just in case you want to make these.
Supplies
I ordered the paper cups, paper cones, and little plastic spoons from The WEBstaurant Store. Here's exactly what I ordered:
- Solo 325 3.25 oz. White Paper Souffle/Portion Cup (250/box)
- Genpak Harvest W4F 4 oz. Rolled Rim Paper Cone Cup (200/pack)
- 3" White Polypropylene Taster Spoon (250/pack)

Here's what the other supplies looked like:


Now let's take a look at what I learned the first time around.
The Trial Run
I used a cake mix. Yes, I know, you're all gasping in horror. Remember that I was aiming for creativity, and I'll take a shortcut anywhere I can.

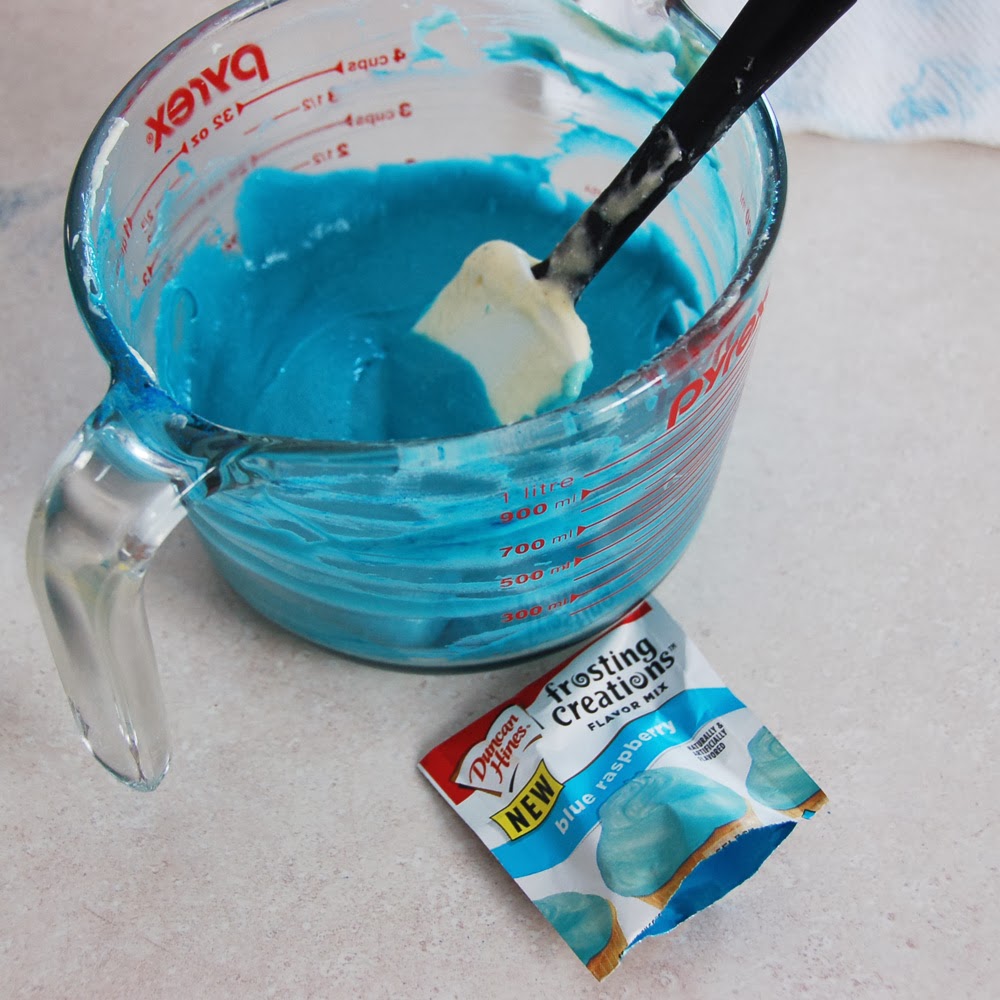
For flavorings I chose Duncan Hines Frosting Creations Flavor Mix in Blue Raspberry for the blue layers and maraschino cherry juice for the red layers. I was happy with the blue, but the cherry juice actually ended up being not strong enough for my liking. I wanted snow cone flavors, so I wasn't afraid to go with something a bit artificial and sweet.
I also used gel food colorings (I didn't even end up using the blue because the flavor packets had enough blue coloring in them).

I also used disposable pastry bags:

I started by mixing the ingredients for my cake mix.


I did a bunch of fancy calculations so I could divide my cake batter into thirds and have the white and blue batters have the right amount of water while I replaced the water with cherry juice in the red batter. It worked out just fine, but the flavor didn't make it worth it.
I added the blue flavor powder to one third of the cake batter. I slowly added and tasted, and I ended up using most of one packet of flavoring. For the real deal, I just did a whole packet.


I left the white third of the cake batter as it was.
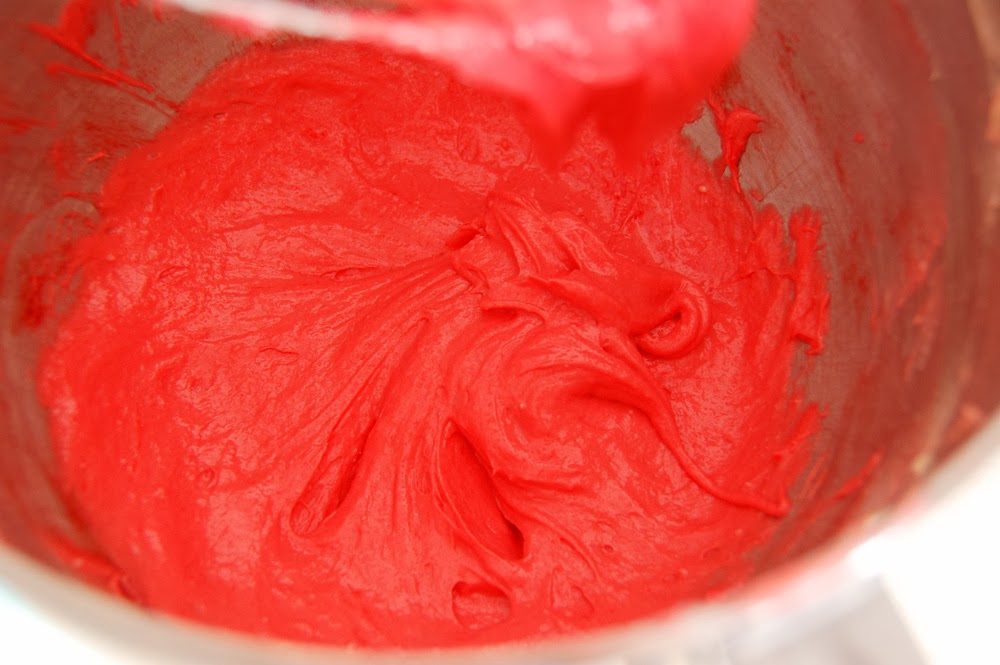
For the red third of the cake batter, I added the cherry juice and some red gel food coloring.


I filled three pastry bags with the three cake batters.

At first I taped them together near the tips and near the tops.

In the middle of filling my baking cups, I got very frustrated and ripped the tape off that was near the tips. The colors weren't staying on their own sides.
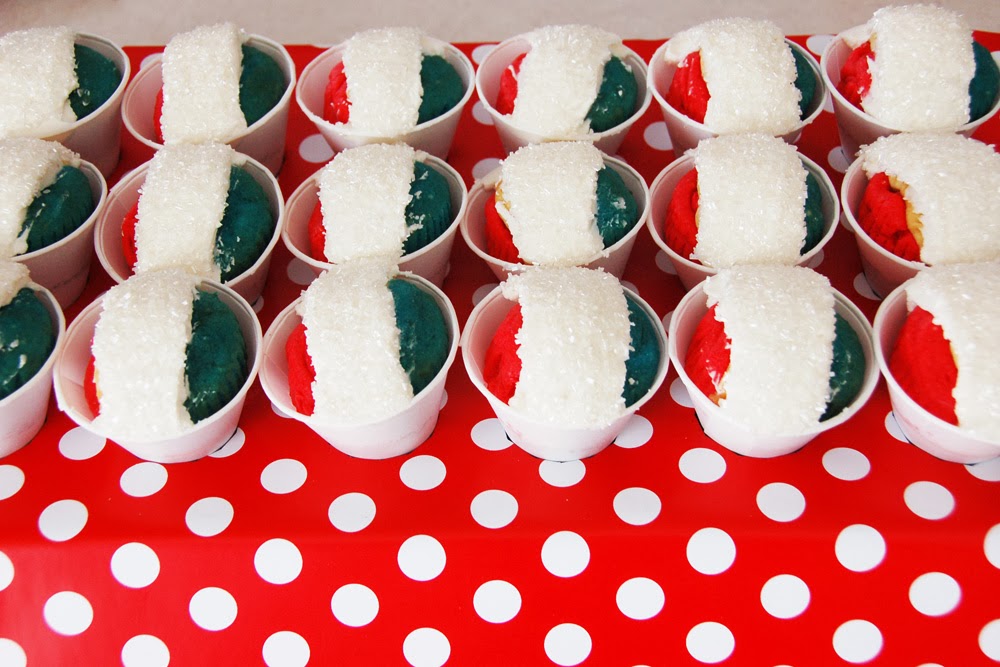
I cut off the tips of the bags (be sure to cut the same size on each bag) and filled my baking cups by gently squeezing and moving the pastry bags forward and back to fill in each color at once. I filled one pan with the paper baking cups I had ordered and the other pan with random cupcake liners I had on hand. Those cupcakes were later put into the paper cones.


This is what happened when my pastry bags were taped together too near the tips:

This is what happened when I did it correctly:

I put the cupcakes into the oven and set the timer for just under the recommended minimum baking time. I hate overbaked treats. I kept checking on them every few minutes, snapping photos each time. Somewhere around 14 minutes of baking time, I thought they looked just about done. Then I was called away to a child-sized emergency. By the time I got back to the cupcakes, they were clearly overbaked. Grrrrr!


This wasn't my dirty oven. I, uh, used a friend's oven for this project. Ahem.
So the cupcakes were definitely very overbaked, but I still wanted to finish out my trial run with frosting and sprinkles.
I let the cupcakes cool completely before proceeding.


The cupcakes in the paper cups I ordered were ready for frosting, so I played around with the ones in traditional liners to see how they'd fit in the paper cones.
In the chaotic sideshow that was me trying to frantically fill the liners with three colored cake batters, I didn't fill each cup exactly the same. That meant I had some cupcakes that were smaller and some that were larger.
The smaller cupcakes fit right inside the cones without any alterations.

The larger cupcakes just needed a little trim off the bottom round edge so they'd fit down into the cones.


I whipped up a batch of buttercream frosting and divided it into thirds. I used clear vanilla (instead of regular vanilla extract) so the white frosting would be as white as possible.

I tinted one third of the frosting blue by adding about 2/3 of another packet of that blue flavoring.

I added cherry juice for flavoring and gel food coloring for color to the red third of the frosting.


I also put my sprinkles into three bowls, one for each color. For the trial run, I used regular colored sanding sugar (with a fine texture) for the red and blue, and I used some larger clear crystals that I had on hand for the white.

I was super nervous about this part. I had read Bakerella's instructions for frosting, and I didn't think I could do it right. Turns out it was super easy.
I used my little offset spatula that you may have noticed above in the picture of white frosting. I started by applying a strip of white frosting on the center stripe of the cupcake. I globbed it on in the middle and tapered it toward the edges.


Then I dipped it in the white/clear sprinkles.

Next I filled in red frosting on one side (over the red part of the cupcake). Then I dipped that portion of frosting in red sprinkles.


Then I did the same on the other side with the blue frosting and blue sprinkles.


Add a little spoon and it looks like a snow cone in a cup!

For the cones I unwrapped the cupcakes, trimmed them if necessary, frosted and sprinkled them, and then placed them in the paper cones.


What I learned from the trial run:
- The blue Duncan Hines packets worked well for both flavor and color.
- The cherry juice flavor wasn't strong enough for my liking.
- It was a bit difficult to tape the three bags of cake batter together just right to fill the cups with batter in nice even stripes. For the real baking session, I didn't tape them together at all. I just used one hand near the top to squeeze and the other hand near the tips to guide them.
- Pay closer attention to filling the cups evenly.
- It didn't make a full batch of 24 cupcakes.
- I would need a double batch of buttercream frosting.
- Since I only have one offset spatula, it was easiest to do all the white frosting stripes, wash the spatula, do all the reds, wash, then do all the blues. The assembly line worked well.
I repeated what I had done for the trial run, but I made the following changes:
- I wanted a powdered flavoring for the red batter, so I looked for a red flavor of the Duncan Hines Flavor Creations. The best I could find was a pink one that was Strawberry Shortcake flavor. I also picked up a few packets of Cherry Koolaid. More on those later.
- I stuck with the paper cones for presentation of all my cupcakes. It just seemed to look more like a snow cone.
- I planned on having 18 good cupcakes for presenting at the competition (rather than 24).
- I added straws to complete the snow cone look.
- I made a holder for the cones. More on that later, too.
- I shortened the baking time and watched the cupcakes carefully so they wouldn't be overbaked.
- I bought different sprinkles that were larger crystals. They looked great, but I still had to fill in with the smaller sprinkles to assure that the frosting didn't show at all.
Let's talk about that frustrating red cake batter.
I chose two new flavor contenders:

I started with the Strawberry Shortcake flavoring because I was already happy with the blue version. Unfortuantely, I didn't think the flavor was very strong or very tasty. I added a bit of cherry Koolaid to the batter to try to rescue it. I kept mixing and tasting, and I paid for all that mixing when the red batter didn't rise properly in the oven. I also wasn't crazy about the mix of flavors. If I did it again, I'd probably just use cherry Koolaid and possibly add a bit of sugar since Koolaid is unsweetened.
Here are the sprinkles I used this time around:

Most of the larger crystals I had seen were "pearl" and that wasn't what I was going for. I found the blue sprinkles at Hobby Lobby, the white at Walmart, and the red in the Valentine's section of Walmart:

Like before, I mixed up my cake batter and divided it into thirds. I added flavoring to the blue and the aforementioned flavors (plus gel food coloring) to the red.
I used the pastry bag method to fill some plain white cupcake liners. Even with my careful measuring, I ended up with more red and blue batters. Those cupcakes were happily devoured by my husband.


I baked the cupcakes for about 14 minutes.


Can you see how the red cake batter didn't rise to the same level as the white and blue? So frustrating!
I let my cupcakes cool and removed all the wrappers.

I placed the cupcakes into the paper cones and set them up in the holder I made so I could start frosting.

I started by applying all of the white frosting stripes and dipping them in the white sprinkles.

Then I applied the red (pink) frosting and sprinkles.


After I dipped the red portions in those large crystal sprinkles, I could still see the pink frosting in places. Not cool. So I got out my leftover red sanding sugar from the trial run and dipped the red sides of the cupcakes in the sanding sugar. It filled in any gaps left between the larger crystals.
Then I frosted and sprinkled the blue sides.


As you may have noticed, I lined up the cupcakes so the stripes are opposite from one column to the next. Rather than all of them having the blue on the left and the red on the right, I started the first column that way. Then the next column is lined up with red on the left and blue one the right. You see?
That was so they'd look nice once I placed the straws in them.
I needed nine blue straws and nine red, so I cut three blue straws into thirds and three red straws into thirds.

I placed all the straws at an angle in the left frosting stripe. I put blue straws in red frosting and red straws in blue frosting.


I secretly wanted to leave them with just the straws, but I figured the spoons would be functional so people could eat the cake out of the cones. So, I added a spoon behind each straw.


I was still unhappy about one thing: the frosting soaking into the paper cones. Did you notice that too? So I followed my husband's brilliant suggestion and just put a second cone over each cupcake's paper cone. All better.


And they were done!
The Verdict
Are you wondering how the cupcake competition went? Well...drum roll please...I won Most Creative!
The Snow Cone Holder
Since this post is already ridiculously long, would you also like to see how I made that polka dot holder? Sure thing.
I was originally thinking of covering a box to be my snow cold holder, but we didn't have one the right size. Jared and I started looking around the house for something else that could work, and Jared spotted a large foil pan.
I turned the pan upside down since I needed a higher surface to hold the snow cones. I lined up the paper cones on the pan to make sure I could fit 18. They fit in 3 rows by 6 columns. Perfect.
Then my math nerd husband who had been so very helpful led me slightly astray. Let me explain.
He told me to measure the pan's surface and divide it into fourths going the direction where I needed 3 rows of cones and then by sevenths going the other direction where I needed 6 rows of cones. Where the lines intersected would be the centers of the circles I needed to cut for the cones.
Let me remind you that you have to cut circles smaller than the largest part of your cones. Otherwise they'll just fall through! I had a circle stencil that was just the right size. I tested it by just putting a paper cone down into the stencil, and it seemed to hit the cone at just the right spot.
I traced all 18 circles with my intersecting lines in the centers.

Then I sat and deformed my hand by cutting out each of those circles. I just used sharp kitchen shears to poke through the center and then cut my way around the black circle, just like I learned in grade school. Only foil pans are harder to cut than construction paper.

Then I raided my wrapping paper collection and found some cute red paper with white polka dots. It's the good stuff from Hobby Lobby that's really thick and has the grid on the back. Don't you love that?
I didn't do anything fancy here. I just took a deep breath and forced that paper to fit over the pan. Yes, the corners could have been prettier. I let it go.

I used red duck/duct tape to secure the paper inside the pan. I didn't think regular clear tape would hold it, and I got a kick out of using matching tape.

I worked from the inside of the pan to address those circles. I placed my self-healing mat under the pan and used my craft knife (looks like a scalpel). I first cut a line dividing the circle in half, and then I cut a perpendicular line to divide the circle into quarters. Then I cut each quarter into thirds by starting my blade tip at the edge of the circle and pulling it toward the center. After all my cutting was done, each circle was cut into twelve slices. Like a pizza. Mmmm pizza.
I pressed the slices toward the inside of the pan and secured them with little strips of the red tape.


Once all 18 circles were cut and taped into place (and I had watched 47 events of the Winter Olympics while working), I was done!


 |
| Inside |

I checked to make sure that the cones would fit nicely.

The snow cones fit perfectly in the circles. Remember when I said that Captain Math (aka my husband) led me astray? Well, he helped me get all of my little circles exactly evenly spaced. However, what I really needed to do was to get the outer circles as close to the edge as possible to allow the most space between circles. I still would have wanted them nicely lined up and evenly spaced, just not with much space around the border of circles. Make sense? My finished snow cone cupcakes ended up being very crowded and touching, and I just wished they were a little more spaced out.
And there you have it!
It was a lot of work, but you know I always love a challenge. Plus I have to defend my title each year at this competition. :)
Jessica