Showing posts with label household. Show all posts

Wednesday, October 5, 2016

Easy Dinner Planning

I'm not quite sure how we got here, but I'm told we are into October already.  Since time just keeps picking up speed, I wanted to share with you one way that I save time and sanity:  I plan my dinners for a whole month at a time.

This makes it easy to compile a weekly grocery list.  This also helps me with my least favorite time of day:  the after school tornado.  School pick up is crazy.  Then we have back packs everywhere and papers to be signed and filed and adored.  There are snacks.  There's homework.  And just about the time I am ready to drop, I have to make dinner.

Gone are the days of facing the giant dreaded question, "What should we have for dinner?"  Now I don't have to think about it.  I simply check my dinner calendar and get to work.

A friend recently asked me to share my whole process with her so she could start planning her dinners using her own recipes.  I thought maybe there's someone else out there who could benefit from a simple step-by-step guide.

1.  Start by making a list of dinners your family eats regularly.  You may have to sit and think through these, or you may want to go through your recipe box and/or cook books.  This is probably the most time-consuming part, but you only have to do it this one time.

These are the dinners my family eats regularly.
2.  Make a list of any dinner recipes you would like to try.  Flip through cook books and peruse Pinterest.  It's time to actually try those recipes you pinned.  Since my family has specific dietary restrictions, I made a list of dinners I want to try for my whole family and a list of recipes that would just be for Jared and me.  On nights when I try a Jared-and-me recipe, my kids will eat chicken nuggets, mac and cheese, leftovers, or something else simple.


3.  Get a blank calendar.  Thanks to amazing graphic artists who post their work online, you can get all sorts of adorable printable calendars.  This year I printed my totally free and completely adorable calendars from Short Stop Designs.  You can find them here.  If you're ready to plan ahead (overachiever), you can get the 2017 free printable calendars here.

These super cute calendars print with a "Notes" section on the bottom.  I trim mine off, and you'll see why in a minute.

4.  Write your dinners on your calendar.  I like to sit with my family calendar (on my phone), my dinner calendar, my dinner lists, and a pencil.  I start by checking the family schedule for days when we will need a Crock Pot meal or something quick and easy.  I fill those in first.  I put new recipes on days that are less hectic.  Sometimes I get all responsible and line up dinners in a row that will use the same produce or add-ons.  Just keep filling in until you have a dinner for each day.


Now you can see why I cut off the bottom of my calendars.  I display my dinner calendar on this awesome reclaimed wood clipboard that a friend made for me.  It's part of this gathering of decorations in my dining room:


Every time I change the monthly dinner calendar, I change the paper on the right to go with the season or current holiday.  I change the Bible verse on the chalkboard whenever a new one strikes me.

Anywho, back to dinners.  So you can see that this process is very straightforward and simple, but some of you may be like me and just need someone to tell you step-by-step what to do.  Once you do it once, it's faster and easier for future months.

When the next month comes, you can simply copy your dinners in the same order onto your new calendar.  However, I like to customize each month.  I like to take our schedule into consideration and space the easy and more time-consuming dinners accordingly.  Plus I just need a little variety!

This is what works for our family.  It only takes me about 15 minutes to plan an entire month's worth of dinners, and my grocery shopping and meal prep are simplified.  I hope this helps some other tired mama bring a little order to dinnertime!

Jessica

Sunday, May 15, 2016

Finishing the Garage

As we continue in my mission to fix things in and around our home, I would like to show you the progress we've made in finishing our garage.

I'm sure it seems odd to many people that I would choose to put money and time into updating the garage rather than rooms in our house.  Over these last few months when we were constantly going to appointments, not to mention the daily drop offs to two schools and pick ups from two schools, I felt like I saw the garage more often than any other room in my house.

Our garage had drywall but the seams had barely been taped and not really mudded.  Jared and I finished drywall once in our old house.  It was hideous.  So for this job we finally broke down and paid someone else to do the work so it would be done correctly.  We hired a friend from church who is very particular about his work.  The best part was that he is very trustworthy so I didn't have to feel creeped out about having a stranger working in my home everyday.

Here is what our garage looked like before:


This is what the garage has looked like since we moved in.  The previous owner (who built the house) had put up the shelving and made the brackets up high for additional storage.  It's all good in theory, but I definitely didn't feel like we were maximizing the space.

We cleared out as much stuff as we could.  Some things were relocated and some things, unfortunately, just had to stay in the garage because it rained nearly every day of the garage project.  Plus we didn't really want tools and other valuable items sitting outside.


Then be brought in our friend William and had him do his thing.  He had to remove a lot of the old tape that was cracking and peeling.  He filled many many holes and covered old screws.  He even secured a lot of the sheetrock that he didn't think was properly installed.  He also brought in leftover drywall from home to fill in above our electrical breaker box.

I could already tell a huge difference just when he was finished with applying the joint compound.


I got annoyingly excited when William started priming!


There was a lot of life happening during the week that William was working on our garage.  I was so busy that I forgot to take a picture of the walls all primed.  But I can tell you that it was amazing to see them look like actual walls.

I was gone all day Friday while William painted the walls and ceiling.  Then we were busy helping my mom move.  Then we had Nolan's birthday party with his friends.  So last night was my first chance to really look at the finished garage.  And I happened to notice that it's the wrong color.

I won't name any names.  Let's just say that Spouse A asked Spouse B to get a 5 gallon bucket of the gray paint from our bedroom.  Spouse B found a leftover paint can in the basement that was a shade of gray and had our local hardware store do a color match and make 5 gallons.  Said paint was handed off to William who applied the paint in the absence of Spouse A.  And then Spouse A saw that Spouse B had actually color matched the paint color from our living room.  And spouse A hates that color.

Oh well.  This is what we like to call a First World Problem.

So our garage is finished and is a shade of blue instead of gray.  But it's finished.  Jared and I spent the evening cleaning up all the dust.  We moved a few things back to their intended spots and the rest we just put on Jared's side of the garage so I can park in my spot for now.  I still want to take some time to figure out the best way to organize our stuff rather than just putting the old shelves in their old places.


Now as I take the kids to school and go about the busyness of May, I can get a little jolt of happiness every time I see these nice smooth finished (albeit blue) walls.  Someday we will have great shelves and pegboard and cool hooks and a painted door, and all these things will make me happy as well.

Jessica

Monday, April 25, 2016

Fix It

Ever since we returned home from Mayo, I have been a mad woman on a mission to take care of all the things around the house that bug me or that need attention.  I have never been good about finishing things, so this sudden burst of motivation is odd to me.  I'm pretty sure something in me snapped and decided that if I can't fix Nolan then I will fix my surroundings.

So I set to work finishing all sorts of projects we had previously started.  We redecorated the kids' bathroom, and I'll share that in its own post.  Sometime.

We had painted our bedroom and put up pictures and curtains.  The last major piece was choosing a bedspread, which has taken me more than a year of browsing for the perfect one.  So I finally just bought one.  I originally wanted a frosty mint green, and this one is more blue, but I still love it!


I'd still love some decorative pillows and taller lamps, but I'm calling this one done for now.

We donated our dishes to a local charity and bought plain white Corelle dishes.  They are thinner and take up less room in our cabinets.  They also came in multiple sizes of plates and bowls, which has been a huge plus.  I threw out the kids old plastic "kid" plates and bought the divided Corelle plates for them.


You can see that I bought two shelf thingies to help organize the plates.  I also rearranged all of our cabinets so like items are together and everything makes a little more sense.  I moved the coffee pot to the counter under the cabinet with mugs.  I decluttered our plastic leftover containers to just what we use most.

Some of our drawers were already fairly well organized, but three of them were in desperate need of attention.  I didn't take "before" pictures because, as previously stated, I was a madwoman on a mission.


We had cute gray placemats that were a basketweave pattern.  It was hard to wipe them completely clean because inevitable spills would get between the woven strips.  So I went to Hobby Lobby and purchased some laminated fabric.  I cut it into rectangles to make my own placemats.


They would have been slightly nicer if I had used my rotary cutter and ruler rather than scissors, but again I plead the insanity defense.

My spice cabinet has been driving me bonkers for years.  I pulled everything out of the cabinet and got to work.  I ordered clear spice jars from Amazon, and I transferred my spices into the matching jars.  I used the labels that came with the jars, and I used my new label maker for the rest of the spices.


I still need to figure out how to organize the new spice jars in my cabinet, but don't you think they're better already?  I can guarantee you there will be some alphabetizing involved. :)

I had to run to Hobby Lobby this weekend and I just happened to pick up this cute little sign.  I hung it above the hooks where the kids hang their back packs and jackets.


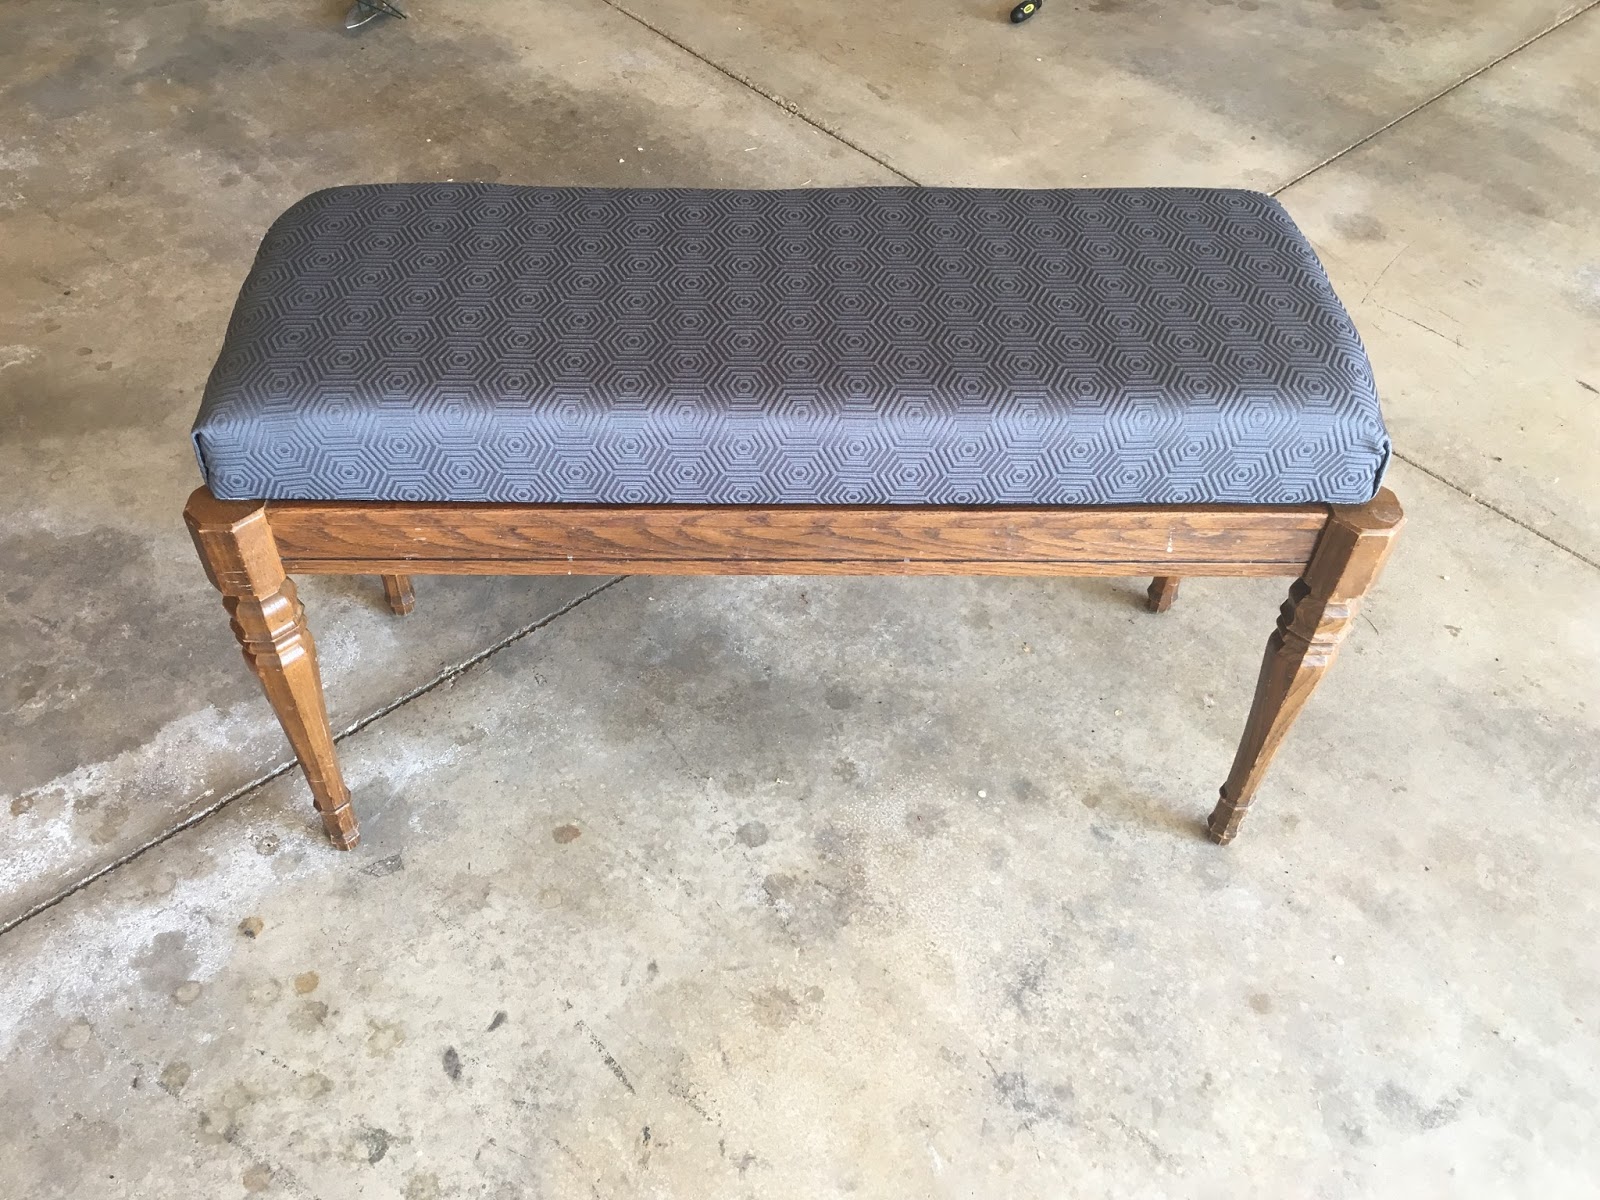
My final project to share with you today is one I completed this past weekend.  We recently inherited a piano, which made us quite ecstatic as Griffin has a knack for playing it.  However, the piano bench left a little something to be desired in both the comfort and style categories.


So I removed the top by unscrewing the hinges.


I spent for-ev-er pulling staples out of each individual layer:  the trim, the white fabric, and the yellow upholstery.  My hand turned into a misshapen claw.


I cleaned the piano bench and the naked piece of wood that had been stripped of all old fabrics and trimmings.  Pretty sure I inhaled asbestos.

I had purchased some 3" foam from JoAnn Fabrics as well as some gray upholstery fabric.  I was looking at fun fabrics but ultimately decided to go with something very neutral since this is a semi-permanent piece.  But I did find one with hexagons in the weave!  I heart hexagons!

I put the foam on the wooden bench piece, wrapped the fabric around, and used a heavy duty staple gun to afix the fabric to the board.  Then I covered the back with a gray utility fabric, and I covered the edges of that fabric with some ribbon trim.


I then screwed the hinges back onto the seat board through the original holes.


I was amused to see the service record sticker inside the bench:


Here it is reunited with the piano:


Now I have to go fold my fifth load of laundry for today.  Anyone have a fix for that?

Jessica

Tuesday, April 5, 2016

A Modern Wreath

Yesterday I just wanted to do something, anything, to feel normal.  So I decided to tackle a craft.  And finish the heck out of that thing so I could feel like I accomplished something.

Inspired by this wreath that I recently spotted on Instagram, I made a new modern wreath for our front door.


I had some navy and white striped fabric left over from a previous project.  I went to Hobby Lobby and bought two embroidery hoops, some heavy duty Heat & Bond, and some fake succulents.  I had the white ribbon on hand already.

I love succulents.  They're like a plant-flower hybrid.  I really want some live ones in my house.  But at least now I found an excuse to get some fake ones!


I decided to use an 18" embroidery hoop and a 12" hoop.  I just liked these proportions.

I started by laying the bigger hoop on my fabric and cutting a square of fabric that was a little bigger than the hoop.


Then I cut a matching size (ish) square of the Heat & Bond.


I followed the package instructions and ironed the Heat & Bond to the back of my fabric.  This isn't strictly necessary but it gives the fabric more thickness and stiffness.


The next step was to cut out a donut-shaped piece of my fabric.  Mmm donuts.

I chose to separate the two rings of my bigger embroidery hoop and trace around the inner ring.  You could also trace around the outer ring and just cut a little inside your line so your fabric doesn't hang outside the hoop.

I used a black pen on the white stripes and a white pencil on the navy stripes.  Because I'm fancy like that.

Next I traced my inner circle.  I laid the smaller hoop on the fabric and measured all around it to make sure it was centered.  C'mon people, you knew I would be obsessive.  I traced inside the small hoop and knew I'd have to cut just outside the line to avoid having fabric show in the middle of the wreath.


I cut out the fabric donut. 

My glue gun had been heating up while I was thinking about donuts cutting out the fabric.  I very carefully hot glued the embroidery hoops in their proper places.


You may have noticed that I chose to place the screw-clasp-closure-thingy on the very top of the big embroidery hoop and in the bottom right region of the smaller embroidery hoop.  I knew my succulents would cover said thingy on the smaller hoop.

I had picked up some random fake succulents from Hobby Lobby.  I used wire cutters to cut off the stems.  I played around with the arrangement and then hot glued them to my wreath.


I got a white ribbon from my endless hoard of ribbons and fed it between the two rings of the big embroidery hoop.  Luckily I hadn't glued them together.  I tied a pretty bow.  Then I realized that it would be slightly twisted if I hung it on my wreath hanger as-is.  So I grabbed a white pipe cleaner, fed it through the knot of the bow, twisted the ends, and made a ring.


That made it hand straight forward on my wreath hanger.  When I put it up on our front door, I had to retie the bow because the wreath hung too low.

Don't we wish that my front door was painted a fun color?

Yes, it's crooked in this picture.  Yes, I fixed it.  No, I didn't take a new picture.

So I accomplished something.  I did something creative for the first time in quite awhile.  It did come at a price.  When Nolan and I went to Hobby Lobby for these supplies, he was suffering with a colossal headache.  We had to stop three different times for him to lay down on the floor in Hobby Lobby.  While other shoppers and employees looked at us like we were loony.  But lying flat eased the pain and then we could make it through a few more aisles.  I felt terribly selfish for dragging him to Hobby Lobby.  But we are trying to get to a new normal where we don't just shut ourselves at home and lay around trying not to anger his pain.  So I made a wreath.  Apparently that is part of my new normal.

Jessica