Thursday, October 31, 2013

Halloween 2013

We have had a fun Halloween, despite some crummy weather.

We had "Trick or Trunking" at church Sunday night, and both boys had a Halloween parade today followed by parties in their classes.  I was in charge of organizing Nolan's class party, so I am relieved that it's over and went well!  Nora had her Halloween parade yesterday morning at TLC.

Here are the kids right before we went out trick-or-treating in our {new!} neighborhood tonight:


Nora wanted to be a ballerina, so I bought a black leotard and black tights that she can actually use for ballet class.  I was going to make her a tutu, but we found this one at a garage sale for $3.  Nora loved it, and I couldn't have made one for cheaper than $3.

Griffin wanted to be a pumpkin or jack-o-lantern.  A friend gave us a pumpkin costume, but it was too short/small for Griffin.  I was all prepared to make him a costume, but he was perfectly satisfied with this men's t-shirt from Target.  He didn't even want me to add stuffing or anything.  Nolan let Griffin borrow his orange hooded sweatshirt to wear under his costume shirt.

Nolan wanted to be Hulk, and I found his costume online for $20.  I bought a size up so he can continue to wear it at home for play (and he could wear clothes under it at school and to stay warm).  Nolan loves the costumes with the muscles sewn in.  We already had the Hulk hands in our toy box.

I was much more laid back this year.  I didn't do any major work for anyone's costumes, and all the kids loved what they wore.  Everyone was happy.

I snapped a few pictures as we walked our new neighborhood in the nasty rain this evening.  They're just pictures from my phone, so I make no guarantees about the quality.

Nora shared her umbrella with Nolan.

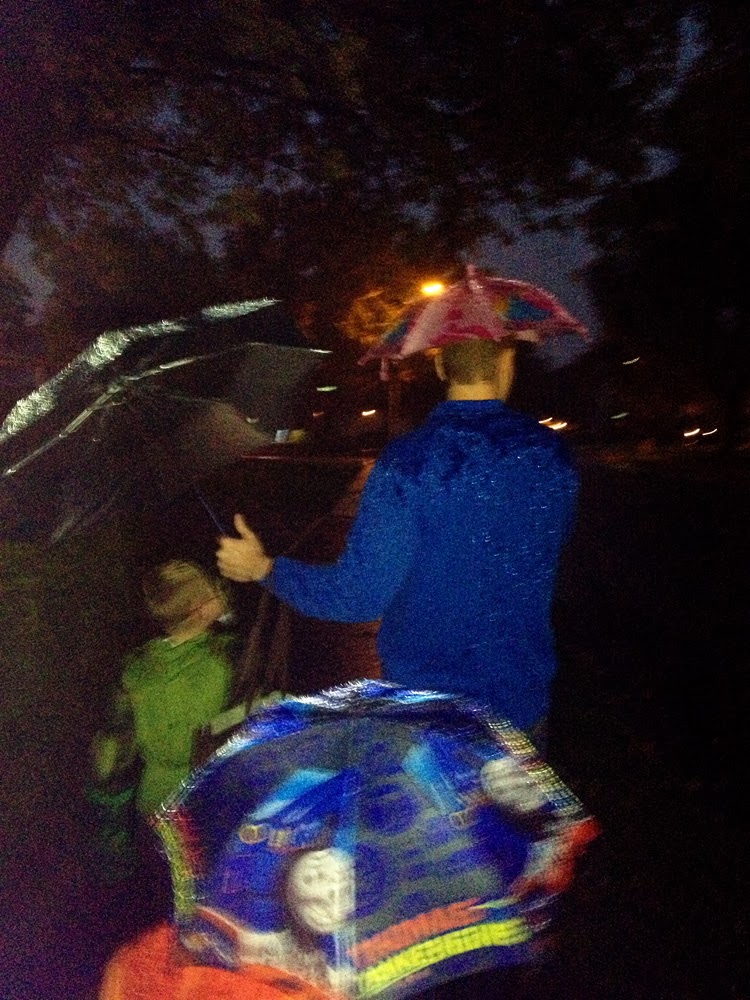
We had to manage costumes, candy bags, and umbrellas.  The kids did amazingly well.  This moment cracked me up because Jared was trying to cover Nolan with his umbrella (since Nolan was wearing Hulk hands), and he covered himself with Nora's umbrella.  Nora was nestled under my umbrella with me, and Griffin is that Thomas the Train umbrella blur.

We were SOAKED by the time we got back home!  Nora's hair got a little curlier with each house we passed (thanks to the rain).

Seriously, her curls make me happy!

Now we are all slumping into a sugar coma (I may have confiscated all Twix from the candy bags).  I hope your Halloween was fun--and dry!

Jessica

Wednesday, October 30, 2013

Headaches and Kindness

Dear Lord, thank you that I don't have a headache right this minute.

I actually prayed that prayer today.  I've been battling a whopper of a headache for more than 3 days.  At times I felt barely functional.  And my stomach forgot that it's been under control for months, and it's been acting like it did last year (pain and nausea).

Sometimes little annoyances and inconveniences can serve as a reminder to be thankful for not having them once they're gone.

In addition to being thankful that I was able to eat lunch today, I've also had the privilege of witnessing some kindness. 

Wednesday mornings are when I run most of my errands because the boys are at school and Nora is at her Wednesday morning preschool program at a local church.  "Running errands" doesn't usually go hand-in-hand with experiencing kindness.  Usually, there are cranky sales clerks, rude shoppers, and annoying drivers.

Those usual folks showed up here and there this morning, but I also happened to notice a couple people who went out of their way to be kind.

At Walmart, there was an elderly woman maneuvering very slowly in front of me.  She happened upon a Walmart employee and asked her a question.  I moved on with my shopping but later noticed the employee slowly moving alongside the elderly shopper, helping her find exactly what she needed.  Most workers would have given mumbled directions and walked off.  This woman stuck with the shopper and blessed both her and me as an onlooker.

It was raining when I picked up Nora, which wasn't a big deal to me since Nora and I had jackets.  However, there was another mother there who had multiple little kids with her, and her hands were more than full.  I noticed a man who works at the nearby funeral home walking with her holding an umbrella over her and her children as they crossed the street and walked (at the pace of little kiddos) to their car.

How awesome to see people putting someone else's needs before their own.  

I had my camera with me so I could take pictures of my little ballerina at her Halloween parade this morning:


After the parade and after the errands and kindness, I ran home to get a quick lunch.  There are a couple of trees near the boys' school (a couple blocks from our house) that catch my eye every single day.  They're just so pretty.  Fall is my favorite season, and I just love to watch the trees change colors.

Since I had my camera in the car, I pulled over and rolled down my window (despite the rain) so I could snap a couple quick pictures of the gorgeous trees.  These aren't exactly frame-quality, but at least I got to capture the gorgeous color.  Just another little blessing in my day.


Here's to celebrating the little blessings in an ordinary day!

Jessica

Monday, October 28, 2013

Fabric Gift Card Holders & Gift Bags

Today's tutorial is a 2-for-1:  tutorials for how to make your own fabric gift card holders and how to make your own fabric gift bags.  They're super easy to make and add a personal touch to any gift.

I made these as part of the birthday gifts for my boys' teachers.  Click here to see those.

First up is the gift card holders.


I made these just like the Fabric Nail File Sleeves but using different dimensions.

Supplies needed:
  • Outer fabric cut 4.25 inches wide by 4.5 inches tall
  • Inner fabric cut 4.25 inches wide by 4.5 inches tall
  • Pellon Peltex 72F Double Sided Fusible Interfacing* cut 4.25 inches wide by 4.5 inches tall
  • Thread (coordinating or contrasting, your choice)
  • Pinking shears
*I already had this Pellon Peltex 72F on hand, and it was perfect for this application.  It is fairly sturdy and it has heat-set adhesive on both sides.  However, you could use many different products.  You could adhere regular interfacing (not lightweight) to one of your fabrics and just stack the other on top.  You could also use Wonder Under to adhere your fabrics together, but you may not have the structure needed for the gift card holder to hold its shape.  Fusible fleece is another option.  I'd love to hear comments from anyone who tries this project with a different interfacing.

Start by cutting your fabrics and fusing them together with Peltex in between, following manufacturer's instructions.


Next you need to sew a straight line 2+5/8 inches down from the top.  This stitching line will serve as your fold line later.  Backstitch at the beginning and end of your stitching. 

Then sew another straight line 1/4 inch from the bottom (backstitch at the beginning and end).  This is part of how we'll finish off this edge.


Then use your pinking shears to trim off the seam allowance below that bottom stitching.  I used my fancy scalloped pinking shears.

This is still the same project.  I just flipped it over so you can see the stitching better.

Lay your project with the "inner" fabric on top and the "outer" fabric behind.  The finished edge should be along the bottom.  Now fold along your stitched folding line (folding finished edge up).  Your finished edge should be in front, and it should not reach the other top edge (we aren't folding it exactly in half).

Stitch both sides and the top by starting in the bottom left corner and sewing that side, turn and sew the top, turn and sew down the other side.  Backstitch at the beginning and end.  (If you're confused, there are a few more details about this process in the Fabric Nail File Sleeve Tutorial.)


Use your pinking shears to cut off the seam allowance on both sides and the top.

Finished front

Finished back

Add your gift card and you're done!


And now for the Fabric Gift Bag tutorial:


These are literally the easiest sewing project that I can think of. 

Materials:
  • Fabric
  • Thread
  • Pinking shears
  • Ribbon for tie
You can cut your fabric to whatever dimensions you want, depending on the size of bag you need.  I cut my fabric twice as tall as I wanted my finished bag.  That way I could just fold it in half rather than sewing the bottom.  This only works if your fabric's pattern can be viewed upside-down and right-side-up.  If your pattern only runs one direction, then you need to cut two pieces and sew them together along the bottom.  Confused?  I hope not.

For the teachers' gifts, I cut the candy bags 8 inches wide by 18 inches tall, which gave me finished bags that were 7.5"x9" (due to seam allowances).  The smaller bags for the office supplies were cut 5 inches wide by 12 inches tall, which gave me finished bags that were 4.5"x6".

So, Step 1:  Cut your fabric.

Step 2:  Fold in half with short ends lined up and right sides of the fabric facing each other.

Step 3:  Sew a seam on each side, 1/4" from the edge.  Backstitch at the beginning and the end.  The top will still be open and the bottom is the fold.  Clip a small triangle from each bottom corner, being very sure you cut outside the stitching.  This just reduces bulk when you turn the bag right-side-out.  It won't be detrimental if you skip this step.

You can barely see the stitching, but there's one seam going up the left side and one going up the right side.

Step 4:  Turn your bag right-side-out.  Use your finger, a pencil, a chopstick, or a corner turner to poke out the corners from the inside of the bag (without pushing too hard).

Step 5:  Use pinking shears to trim the top of the bag for a nice decorative edge that won't unravel.  You can cut both pieces of fabric at once.


You're done!

Fill your bag with a gift and tie it with a ribbon.

These are just a few little touches to personalize any gift!

Jessica

Wednesday, October 23, 2013

Family Pictures (Part 2)

Here are the rest of our recent family pictures.  These were taken near a downtown brick building for a cool backdrop.  These were from the beginning of our photo shoot, so the kids were more cooperative than in yesterday's pictures.  Plus the building blocked the wind, so it wasn't messing with our hair and making us cold.


Now maybe I will print some of these pictures and get brave enough to hang a picture in our new house!

Jessica

Tuesday, October 22, 2013

Family Pictures (Part 1)

Last weekend my sister and I took pictures of each other's families, and then we each edited our own family pictures.  It was really fun after I got over the stress of trying to find five coordinating outfits for my family without being able to go out and buy new stuff!

We first took pictures near an old brick building downtown, and then we went to a nearby park.  Since there are a lot of pictures, I'm breaking them up into two posts.

For today I'm actually sharing the second half of the pictures (from the park).  The kids had run out of good cooperative time, and these pictures are good but not as good as the first set (at the brick building).  I'll save the better pictures for the second post. :)

Enjoy!

I really wanted this pose to work out.  As you'll see...it did not.


The wind was making Nora's hair crazy!  Mine too!


I didn't get a picture of just Nora on the day of our photo shoot, so I took some pictures of just her the next day after church.


And finally, some pictures of just me and Jared:


My personal favorite :)


More pictures to come tomorrow!

Jessica