Saturday, July 28, 2012

Science Discovery Bottles

Fridays this summer have been Cousins days, so we were excited to have Gracen and Layla over again yesterday.  Gracen was gone for a bit for football camp, so I put Layla to work helping me make Science Discovery Bottles

We have been saving Gatorade bottles because they're nice and sturdy for these types of projects.  The kids loved having Gatorade to drink at Nolan's baseball games this summer.  So it was win-win.  I washed all the bottles and removed the labels.

Most of our ideas for these bottles came from the blog Familylicious.

Here are most of the supplies we used:


I basically looked at all the possible bottles we could make and made a list of supplies we might need.  I had lots of supplies on hand and hit up the dollar store for the rest.  Here's a list of most of the items we used:
  • Bottles
  • Vegetable oil
  • Clear shampoo (I could only find transparent green shampoo)
  • Clear hair gel
  • Baby oil
  • Shaving cream
  • Glitter, sequins, beads, or other add-ins
  • Rice (mine has been colored with food coloring)
  • Pipe cleaners
  • Wire
  • Magnets
And here are the bottles we made:

1.  Pipe Cleaners and Magnet


I cut pipe cleaners into 1-inch(ish) lengths, and Nora helped me put them in an empty, dry bottle.  Pipe cleaners are attracted to magnets because of the metal wire in their centers. 

The kids really enjoyed playing with magnets on the outside of this bottle to manipulate the pipe cleaners inside.  It reminded me of the Wooly Willy toy (the man's face with metal shavings you can move around for his hair and facial hair).  With time and creativity, you could make other cool magnetic toys with pipe cleaners.

2.  Hidden Magnetic Objects


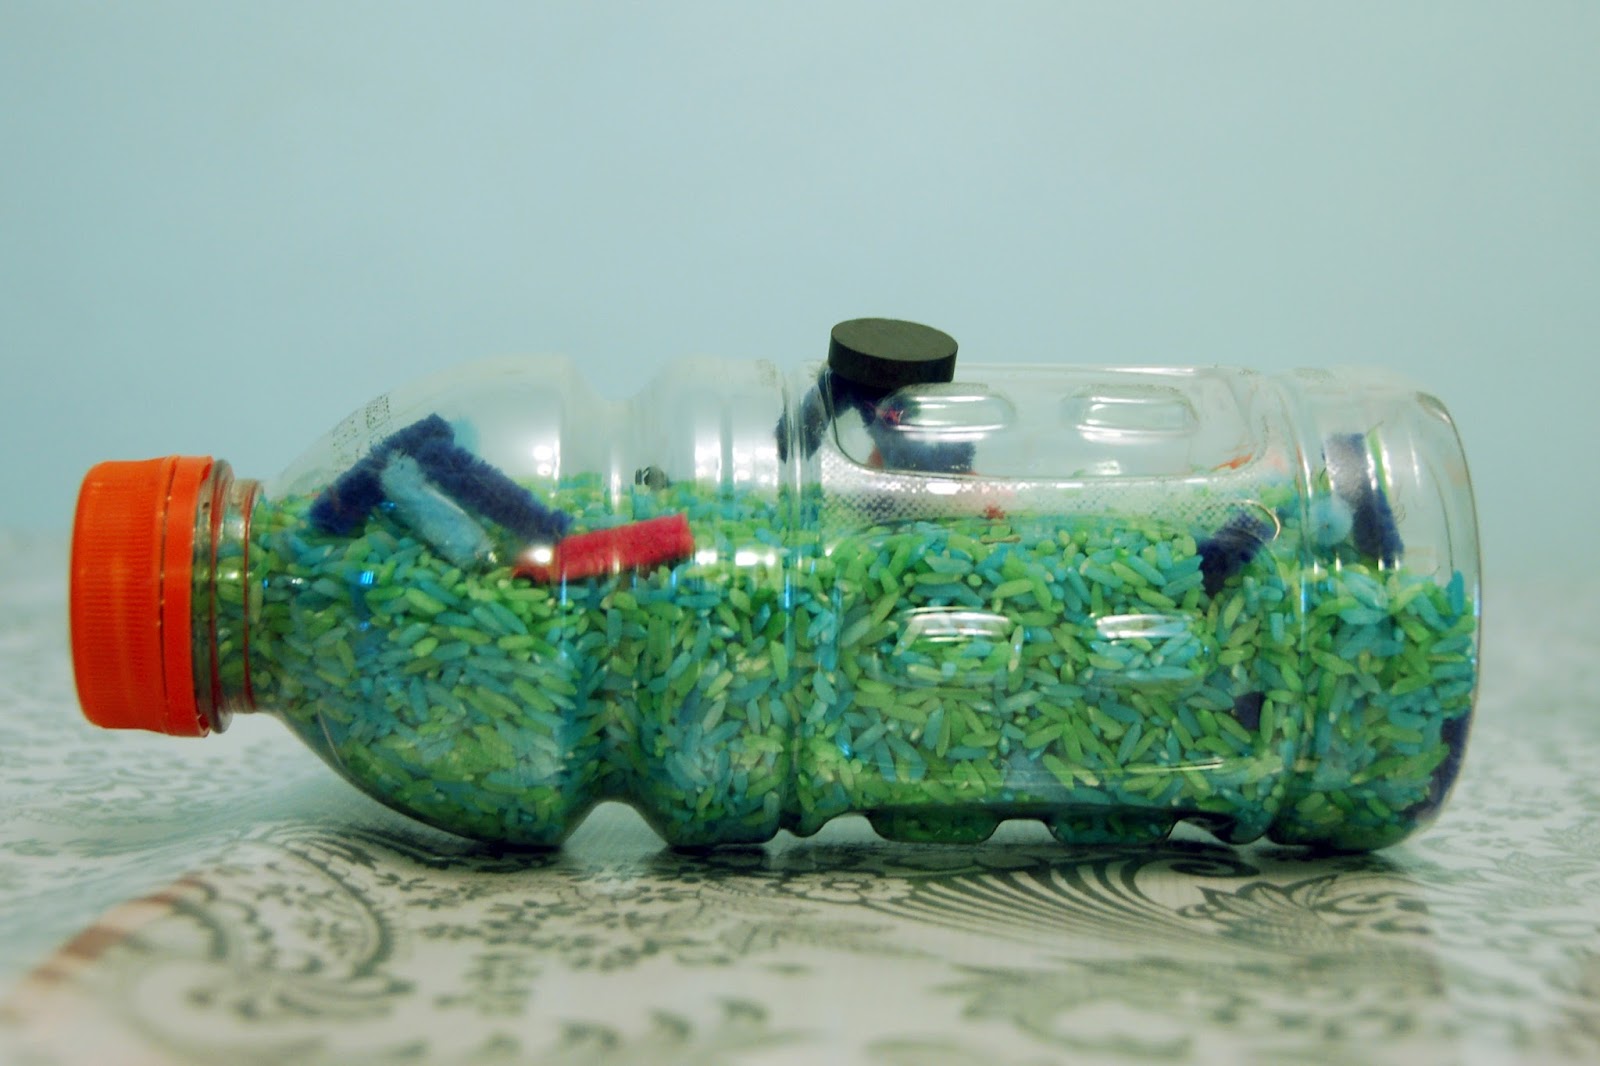
We poured the colored rice into these bottles along with metal objects.  We used more pipe cleaners, some old sewing pins, and pieces of wire that Layla shaped into swirls and coils.  We actually ended up pouring all the contents into a gallon bag and mixing them all up and then pouring them back into the bottle so everything would be nicely mixed.  This was the only bottle that required a funnel for pouring the contents into the bottle.

The kids found it easiest to use this bottle on its side.  They rolled it to find hidden objects and used the magnet to pull the items out of the rice.  They liked this bottle, but it didn't hold their attention for very long.

3.  Static Electricity


This bottle contains squares of tissue paper (the dark purple areas) and bits of styrofoam (packing peanuts) in a dry bottle.

The kids rubbed the bottle against their hair and then used the static electricity to lift their hair.  The boys loved doing it, but their hair is too short!  So we relied on Nora and Layla to see the effects on this one.

Nora wasn't very cooperative with letting me take a picture, so this is all I got:

 
Layla got some good distance with her hair later when I had put the camera away.

4.  Shaving Cream and Food Color


Poor Layla started out helping me with this, and she ended up working on it for a loooong time.  The directions said to spray shaving cream into the bottle and pour in warm water to dissolve the shaving cream foam.  It sounded so simple.


The shaving cream just clogged the bottle opening every time we sprayed it in.  Then Layla used a long-handled spoon to try to poke and scrape it into the bottle.  Then she poured a little bit of warm water over it to push it down.  And then she repeated the process.  It took forever, but she clearly loved being the only kid big enough to do such a messy job.  She was a trooper.

Once the bottle was nearly full, we put in a few drops of food coloring (Layla chose pink).  Then we shook the bottle and...nothing.  It was pretty lame.  Layla was so positive and said in a chipper voice, "At least I had fun making it!"

Later in the day, when the kids were showing my sister our bottles, we noticed that the shaving cream bottle was a little more swirly and iridescent than it had appeared in the morning.  It did still have a thick foam on top of the swirly liquid.

The next day (today), this bottle is so cool!  The foam on top has disappeared, so all the shaving cream is fully dissolved into the water.  If you hold it by the top or bottom and swirl it (rather than shaking it), you can watch the shiny iridescent liquid flow over the contours of the bottle.  The kids love it!


5.  Oil and Colored Water Wave


This bottle is half water (with a drop of blue food color) and half vegetable oil.  We held the bottle sideways and rocked it back and forth to make waves.  It was too hard for me to capture photos of the waves, but they were cool.  This kids really enjoyed this bottle.

We talked about how water and oil will never mix.  Nolan wanted to test that, so he shook it up:


Then we watched it seperate:


6.  Shampoo and Baby Oil


This was the least favorite bottle.  Perhaps we didn't do it right?  It's shampoo and baby oil and food coloring.  The original instructions said to use water color paint or food coloring.  The instructions said to shake it up and then watch it separate.  Here's what ours did:


This bottle just didn't entertain the kids.  It was the most neglected bottle.

7.  Hair Gel and Trinkets


We spent a considerable amount of time choosing treasures to put in this bottle.  We found letter beads to spell all the kids' names.  Each child chose shaped sequins and sparkly embellishments to put in.  We also put in colored googly eyes.  Then I told Layla to put in "a little bit of glitter" and she got a little carried away!  Despite my panicked screeches to stop, she poured in a whole container of glitter.  So, unfortunately, you can't really see any of the treasures in this bottle.  I would recommend skipping the glitter on this bottle altogether. :)

8.  Shampoo and Trinkets


This bottle is filled with the rest of the shampoo (I wish we had just a little bit more to fill it all the way) and some of the leftover objects from the bottle above.  Nolan put in leftover letter beads, shaped sequins, googly eyes, and even some pom-poms. 

This bottle is pretty cool because you can shake it or turn it upside down, and the objects move slowly through the shampoo.  Don't add any water to this one or you'll get lots of bubbles!

9.  Jellyfish


This bottle was an epic fail.  I followed the instructions here.  I used the plain white side of a Target bag because I didn't have any clear shopping bags.  I couldn't get the head of my jellyfish to hold water and air (it just kept deflating), so I put a light-weight bouncy ball in the head (you can see the color swirls).  The bouncy ball head floated so the head would be on top, but unfortunately the tentacles also floated.  So the bag just bunched up near the top.  I couldn't figure out how to get my jellyfish's tentacles to dangle down instead of floating.  It was very frustrating after spending a bit of time cutting all the tentacles.

Here's what the bottle was supposed to look like:


My report:
The most successful bottles were the water and oil wave, pipe cleaners and magnet, and shaving cream and water.   The least successful were shampoo and baby oil and the jellyfish.  All the other bottles were well liked but just not the absolute favorites.

This project went much better than I anticipated.  There wasn't any fighting over who got to help.  The kids shared the finished bottles nicely.  Layla was able to help with "big kid" jobs.  We were able to try all the bottles I had in mind.  We discussed a little of the science behind some of these bottles.  I beamed with pride when my sister came to get her kids and all the kids wanted to show her the bottles we made.

I highly recommend this overall project to any other moms.  Your kids will likely prefer different bottles than mine did.  Maybe you can figure out the bottles that were highly unsuccessful for us!  There are a lot of other ideas for bottles that we didn't even try, too.

Another successful summer activity!

Jessica

Thursday, July 26, 2012

3 Random Household Tips

Apparently I'm feeling a little random with my Random Facts post and now these random tips.  I'll try to get a little more organized in the future.  Maybe. 

I just like to pass along any tidbits that I think might be helpful to someone, so I'm sharing two kitchen tips and a general-life tip.  

1.  Keep your ice cream fresh.
After you scoop out your ice cream, place a piece of plastic wrap over the remaining ice cream in the carton.  Gently press it down to cover the surface of the ice cream, and tuck the edges inside the carton (just so they don't stick out when you put the lid on).  Put your lid on and put it back in the freezer.  Next time you go to get ice cream, it will be just as fresh as a brand new carton and won't have any of those pesky ice crystals.

2.  Save your Tupperware.
When you put leftovers into plastic containers, anything tomato-based can (and most likely will) stain your plastic container.  This is such an easy fix.  Spray your clean container with non-stick spray (such as Pam) before you fill it with spaghetti sauce, chili, etc.  After you've consumed your yummy leftovers, your container will wash up nicely with no orange-red stains.

3.  Backup your wallet.
We backup our computer files and photographs, but most people don't think to "backup" their wallets.  This will take maybe 10 minutes, and it can be done at home if you have a printer/copier/scanner.  Simply photocopy the fronts and backs of all your credit cards, debit cards, driver's license, and even gift cards (most companies will issue a replacement for lost or stolen gift cards).  I even photocopied my insurance cards and library card. :)  My printer also works as a copier, so I just laid my cards face-down and made a copy.  Then I flipped them over and made another copy.  Store your copies in a safe place in your home.  If your purse or wallet is ever lost or stolen, you have all the information you need to quickly cancel debit and credit cards and get replacements for other important cards.  A few minutes now can save you some panic and money later if your wallet should go missing.

Did you learn anything new today?

Jessica

Wednesday, July 25, 2012

Tie Dye Shirts


Last Friday we had Gracen and Layla (our nephew and niece) over again, and Jared was home from work because he had been gone all week on a business trip.  I thought this would be the perfect day to attempt Summer List item #4:  Tie Dye a Shirt.

I had purchased this kit at either Walmart or Hobby Lobby:

It seemed like such a good idea.  It looked like it would be less messy.  However, this kit requires LOTS of time and planning ahead.

There are tablets of setting solution that have to be dissolved in water for 1-2 hours.  Then you twist your shirt and rubber band it.  Then the shirt has to soak in the setting solution for 24 hours.  Then your shirt has to dry completely, which is actually impossible because it's all twisted up at this point.  Then the dye tablets have to dissolve for 1-2 hours.  And the tablets only come in red, yellow, and blue so you have to dissolve an extra set of dye tablets and then mix them to create orange, green, and purple.  Whew!

After all that prep work, I looked at the tube and realized not only that the twisted shirts were too long to fit in the tube but also that we wouldn't be able to control the placement of the dye in relation to the rubber bands.  So we just put the tube aside and didn't use it.

We used the setting solution for all five shirts and just ignored the fact that they were still wet after nearly 24 hours of drying time.  Then I dissolved the dye tablets in plastic cups so we would have enough to mix for the secondary colors. 

Here are the squeeze bottles of dye:


We decided just to hold the shirts over foil pans and squirt the dye in between each set of rubber bands.

I had purchased latex-free vinyl gloves at Walgreen's (the kit directions said not to use latex gloves).  The kids loved wearing the gloves.


Layla started on her shirt first.


Then Gracen started his.


I helped Griffin with his, despite his pleas to do it all himself.

Layla helped Nolan with his shirt after she finished hers.


Jared helped Nora with her shirt.


I loved how super focused Gracen was.


The dyed shirts had to sit in sealed bags overnight.


Then the next day the shirts had to be rinsed and then washed and dried.  My sister followed directions and washed her kids' shirts the next day.  I completely forgot and didn't get to them until the second day after we dyed them.  I actually think my kids shirts came out a little darker because of the extra soak time.


Gracen
Layla
My kids' shirts (Nolan's and Griffin's in the back and Nora's in the front)

Unbelievably, we did not get any of the dye on anyone's clothes or skin or any other surface.  The gloves kept everyone's hands clean, and the foil pans caught any drips.  (Actually, I just remembered that Nolan accidentally got two drips on Layla's sock, but she didn't mind.)

My report:  I would not recommend the kit I bought.  It was way too time-consuming and even confusing.  And the colors were not bright enough.  I definitely recommend the gloves and just squirting the dye in between your rubber bands.  The kids enjoyed this activity and were excited for their finished shirts.  

Tip:  Be sure to squirt the dye in between the folds of shirt fabric or you'll end up with lots of white space like Nolan's shirt (on the left in the picture above).
For "tying" our shirts, we just grabbed the center of the shirt, let the rest of the shirt hang down, and twisted the shirt.  Then I put rubber bands at regular intervals.

So, this was a fun project, especially on a cousins day, but I wouldn't do it again unless we had a different kit and maybe something more interesting to tie dye.

Jessica
P.S.  This is my 100th post!  Woo hoo!

Tuesday, July 24, 2012

Tomatoes

Today is my 8th wedding anniversary.  Wanna know what I did on my anniversary?  I did laundry and canned tomatoes.  So romantic.

My dad came over and let my kids help him plant a cherry tomato plant and a regular tomato plant in our back yard a couple months ago.  We have to water them every single day.  The plants have struggled in the 100+ degree days we've been having, but they have survived.

For a couple weeks now we have been collecting the red tomatoes everyday, mostly cherry tomatoes.  The problem is that Jared and I are the only people in our family who like tomatoes.  So we have been able to just incorporate tomatoes into our meals in order to use up what we have.

However, the last week or so has brought more tomatoes than we could possibly eat.  Can you relate?  Well, if you are also growing tomatoes and drowning in more than you can eat, you may be interested to hear what I did with mine.

First, I brought a pot of water to a boil.  I also filled a large bowl with cold water.  You should add ice to this cold water.  Unfortunately, we don't have an ice maker, so we rarely have ice.  But I did look in our freezer and found two large cooler ice packs.  They did the trick!


{Sidenote: This reminds me of a funny scene from the show "Mad About You."  A convenience store owner says, "Ice is our biggest profit margin.  It's just water and cold and time."  Anyone else ever watch "Mad About You"?}

I made very shallow "x" cuts on the bottoms of the large tomatoes, trying to just pierce the skin.


I placed the tomatoes in the boiling water for about 30 seconds, or until the skin started peeling away from the score lines.


Then I put the tomatoes into the "ice" water.  I let them sit in the cold water for several minutes.  In the meantime, I began the tedious task of scoring the bottoms of all the cherry tomatoes.


I did the same process with the cherry tomatoes, but they only needed to stay in the boiling water for about 10 seconds.


Once the tomatoes were cooled in the cold water, I pulled them out and easily peeled the skins off the tomatoes. 


Once I got all the skins off the large tomatoes, I chopped them and placed them in jars.  Once I got all the skins off the cherry tomatoes, I decided to try to just cut off the tiny spots where the stems had been.  Not easy.  I ended up accidentally squeezing many of the tomatoes.  It was easiest to cut off the very tops of the cherry tomatoes.


I also had four large tomatoes that had weird spots or splits on their skin, so I just cut out the bad spots and chopped the rest of the tomato with the skins on.  I don't mind tomato skins when I eat them raw, but I prefer not to have skins on when they're cooked.  I'm sure I can find uses for all these forms of tomatoes.

I ended up with two jars of skinless chopped large tomatoes, one jar of skinless whole cherry tomatoes, and two jars (one 1-pint and one 1/2-pint) of chopped tomatoes with skins on.


I had these (and more) canning jars on hand because that's just the kind of girl I am.  The wide-mouth half-pint jar is left over from one of the most successful homemade Christmas gifts I've ever made.  I'll tell you more about that another time.

I also had these adorable strawberry jar labels on hand:


I slapped the labels on the jars and put them in my deep freeze.  We can use these tomatoes later in casseroles, chili, or whatever.  I love that none of our homegrown tomatoes went to waste!

And really, the whole point is that these tomatoes are proof that I kept a plant alive!  (see Random Fact #18)

I hope this helps any of you wondering how to preserve all your tomatoes.  I know there are lots of ways to can tomatoes, and this is just how I did it.

Now when I pull them out of the freezer in a few months, I hope that the labels make me happy and not bitter that I spent my anniversary canning tomatoes.

Jessica

P.S.  Here are a few pictures from our wedding album:


And here we are 8 years later: