Showing posts with label cleaning. Show all posts

Monday, April 25, 2016

Fix It

Ever since we returned home from Mayo, I have been a mad woman on a mission to take care of all the things around the house that bug me or that need attention.  I have never been good about finishing things, so this sudden burst of motivation is odd to me.  I'm pretty sure something in me snapped and decided that if I can't fix Nolan then I will fix my surroundings.

So I set to work finishing all sorts of projects we had previously started.  We redecorated the kids' bathroom, and I'll share that in its own post.  Sometime.

We had painted our bedroom and put up pictures and curtains.  The last major piece was choosing a bedspread, which has taken me more than a year of browsing for the perfect one.  So I finally just bought one.  I originally wanted a frosty mint green, and this one is more blue, but I still love it!


I'd still love some decorative pillows and taller lamps, but I'm calling this one done for now.

We donated our dishes to a local charity and bought plain white Corelle dishes.  They are thinner and take up less room in our cabinets.  They also came in multiple sizes of plates and bowls, which has been a huge plus.  I threw out the kids old plastic "kid" plates and bought the divided Corelle plates for them.


You can see that I bought two shelf thingies to help organize the plates.  I also rearranged all of our cabinets so like items are together and everything makes a little more sense.  I moved the coffee pot to the counter under the cabinet with mugs.  I decluttered our plastic leftover containers to just what we use most.

Some of our drawers were already fairly well organized, but three of them were in desperate need of attention.  I didn't take "before" pictures because, as previously stated, I was a madwoman on a mission.


We had cute gray placemats that were a basketweave pattern.  It was hard to wipe them completely clean because inevitable spills would get between the woven strips.  So I went to Hobby Lobby and purchased some laminated fabric.  I cut it into rectangles to make my own placemats.


They would have been slightly nicer if I had used my rotary cutter and ruler rather than scissors, but again I plead the insanity defense.

My spice cabinet has been driving me bonkers for years.  I pulled everything out of the cabinet and got to work.  I ordered clear spice jars from Amazon, and I transferred my spices into the matching jars.  I used the labels that came with the jars, and I used my new label maker for the rest of the spices.


I still need to figure out how to organize the new spice jars in my cabinet, but don't you think they're better already?  I can guarantee you there will be some alphabetizing involved. :)

I had to run to Hobby Lobby this weekend and I just happened to pick up this cute little sign.  I hung it above the hooks where the kids hang their back packs and jackets.


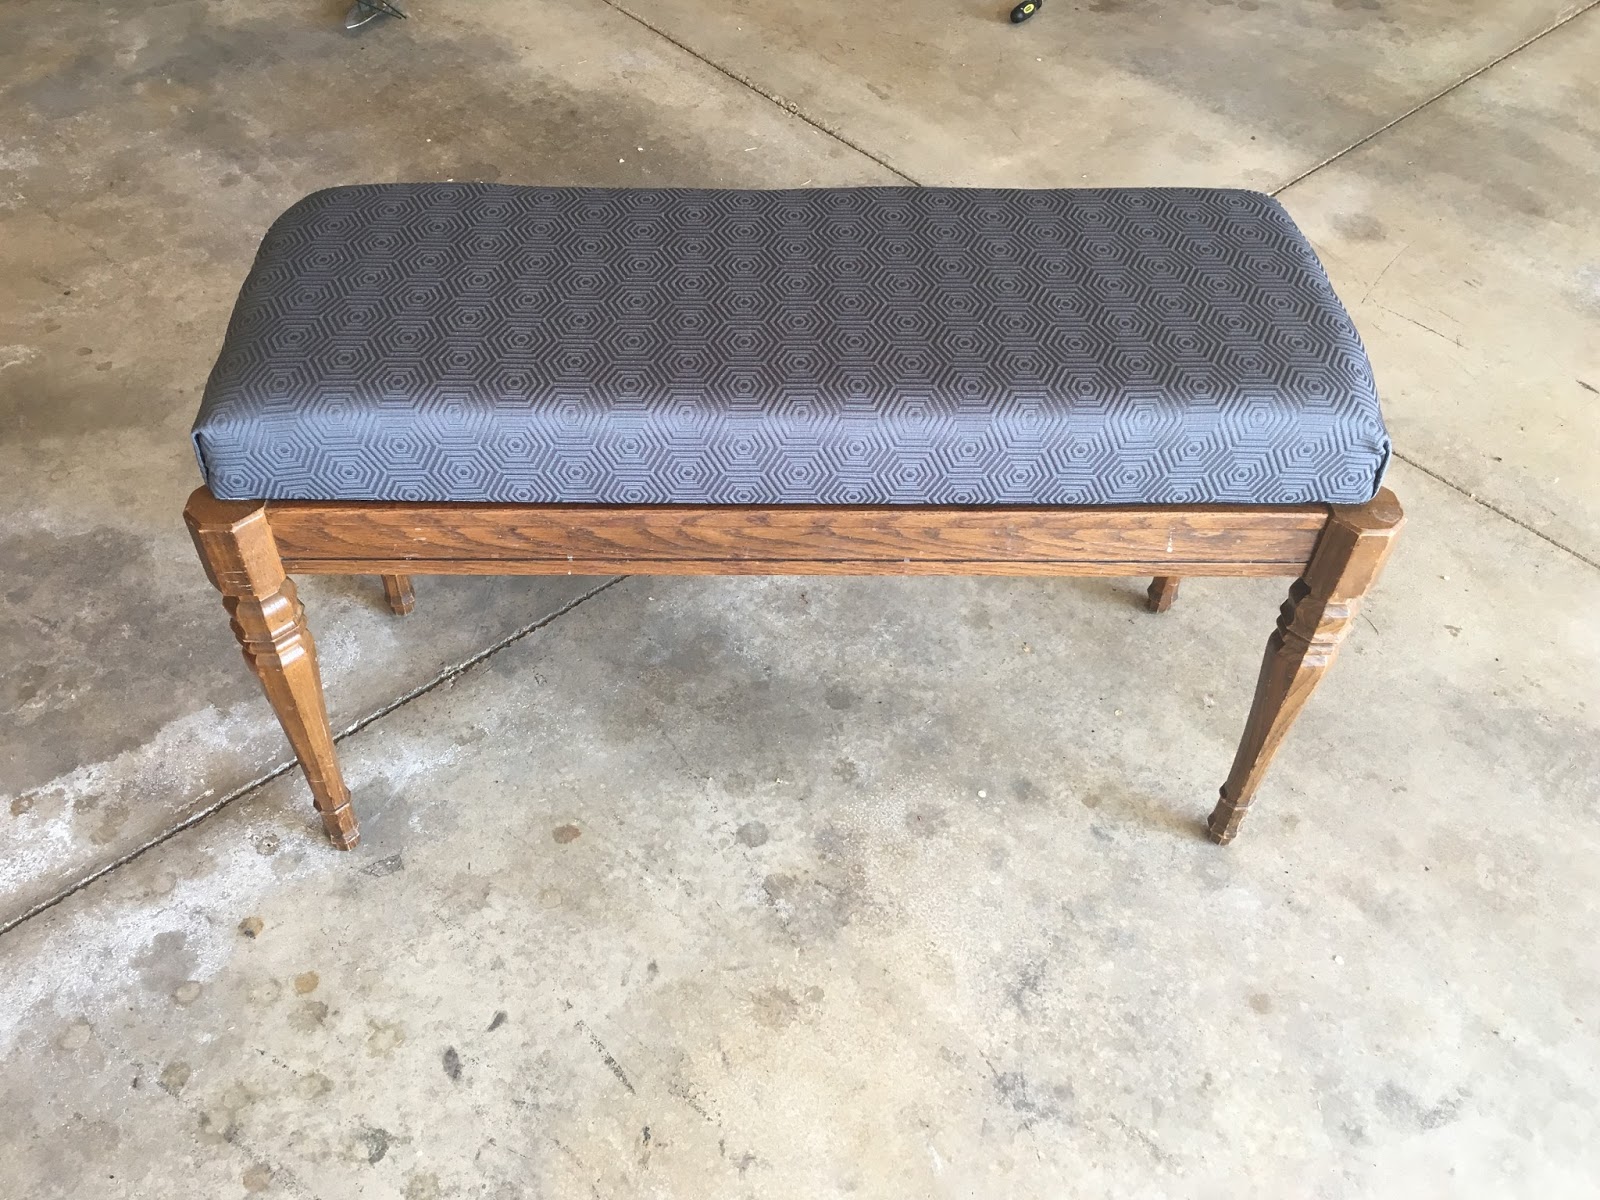
My final project to share with you today is one I completed this past weekend.  We recently inherited a piano, which made us quite ecstatic as Griffin has a knack for playing it.  However, the piano bench left a little something to be desired in both the comfort and style categories.


So I removed the top by unscrewing the hinges.


I spent for-ev-er pulling staples out of each individual layer:  the trim, the white fabric, and the yellow upholstery.  My hand turned into a misshapen claw.


I cleaned the piano bench and the naked piece of wood that had been stripped of all old fabrics and trimmings.  Pretty sure I inhaled asbestos.

I had purchased some 3" foam from JoAnn Fabrics as well as some gray upholstery fabric.  I was looking at fun fabrics but ultimately decided to go with something very neutral since this is a semi-permanent piece.  But I did find one with hexagons in the weave!  I heart hexagons!

I put the foam on the wooden bench piece, wrapped the fabric around, and used a heavy duty staple gun to afix the fabric to the board.  Then I covered the back with a gray utility fabric, and I covered the edges of that fabric with some ribbon trim.


I then screwed the hinges back onto the seat board through the original holes.


I was amused to see the service record sticker inside the bench:


Here it is reunited with the piano:


Now I have to go fold my fifth load of laundry for today.  Anyone have a fix for that?

Jessica

Wednesday, February 20, 2013

The Internet is Teaching Me to Clean

So, remember my house cleaning woes?  Whenever I actually make time to clean, I just don't know what I'm doing.

Well, I finally won one victory!

My stove burner grates are impossible to clean.  They have been covered in brown/black spots no matter what cleaners I use.


Well...feast your eyes on these!


How d'ya like me now?  :)

I used the "Miracle Cleaner" from One Good Thing by Jillee.


I must admit that it took A-LOT of elbow grease to scrub those burner grates.  Plus they have a billion sides, curves, and nooks.  It took a lot of time and energy to get all parts of the grates clean.

They're not totally perfect, but this is the best they've looked since the stove was brand new.  No other cleaner has done this good of a job!

Here the left side is not yet cleaned and the right side is clean and pretty:

 
Don't worry, I cleaned the left side after I took the photo. :)

By the way, I used these sponges that are scrubby but not scratchy:


I really put one of the sponges to WORK!  Unused on the left, and the one on the right was only used for the burner grates:


I did spend more time cleaning other things that weren't quite so victorious.  I had seen on Pinterest a blog post about how to make your stainless steel sink shine.


This particular blog post suggests using vinegar, baking soda, boiling water, Goo Gone, and olive oil.  I thought that was a bit excessive.  So I started by placing vinegar-soaked paper towels around the faucet, sprayer, and back part of the sink.  I left them for about an hour.  I was super impressed with how the vinegar broke up the hard water deposits!

Then I used the "Miracle Cleaner" I mentioned above to scrub the entire sink and fixtures.  After I rinsed off the cleaner, I wiped everything dry.  Unfortunately, I could see the familiar haze and spots left by our stupid hard water.

The very thorough blog post on cleaning your stainless steel sink ended with buffing the sink with olive oil.  I borrowed that idea with my own spin.  I used the mineral oil that is for oiling my wooden cutting boards.  I just poured a little on a paper towel and wiped down all parts of the sink.  Wow!! It made a HUGE difference.  My final confession:  the sink started to show signs of hard water haze the next day.  I don't have the time and energy to detail and oil my sink every single day.  But I'll be doing this occasionally, and I'll definitely remember it for when we're having company over and I want my sink to look really clean and pretty.

My final swing-and-a-miss came when I tried to clean my shower/tub.  I used Jillee's "Tub and Shower Magic."


I mixed the hot vinegar and Dawn dish soap and sprayed it all over the shower tile and tub, as well as the fixtures.  Everyone in my house complained at me for the smell.  I let it sit for about two hours, and then I rinsed it off with a giant wet sponge.

My results:  It generally cleaned the tile and tub, but it didn't bust through the rust stains, it slightly worked through the hard water deposits, and it didn't touch the tub crayon that is embedded in the tile grout.  It was fine as a maintenance cleaner, but it didn't work any miracles for me. 

Hey, at least my stove and sink are clean!

Jessica

Wednesday, November 7, 2012

Free Printable: Cleaning House

Do we all remember my struggles with cleaning my house?

Well, I have been browsing the internet for some ideas for both Thanksgiving and Christmas.  In my great cyber marathon, I came across this awesome free printable:


Doesn't that seem like it should be framed somewhere in my house?


I've been working on several blog posts that will be published in days and weeks to come, but I had to share this cute little sign with you.  You can get the free printable here.

Enjoy!

Jessica

Tuesday, October 23, 2012

Cleaning House

I've spent most of this day cleaning my house.  But you probably wouldn't know it just from walking in my house.

I started by scrub-a-dub-dubbing my long-neglected kitchen sink.  Then I moved over to the stove.  I cleaned that baby real good.  I removed the burner covers and cleaned places that have never seen the light of day.  I hope I didn't unleash a gas leak in my house.  Especially combined with all the cleaner fumes.

I did the usuals too like wiping counters and the kitchen table.  Then I basically spent the rest of the morning testing the limits of how long I could run my vacuum cleaner without blowing out the motor.

I vacuumed every single room in our house, including baseboards and ceilings (we had a bit of a cob web problem).  I used all those fancy attachments.  I used every muscle in my back and arms.  I'll be feeling this tomorrow.

But the average person probably wouldn't notice the difference in how my ceilings and baseboards look.

Cleaning frustrates me.  It's so ongoing that I never feel the satisfaction of being "done" cleaning.  I spent hours cleaning today, and yet there's still clutter in every room.  There's always more to be done.

Another thing that deters me from cleaning is that so many areas of our house look basically the same after they are cleaned.  I don't get to see some dramatic difference between the "before" and the "after."

For instance, here is our hallway floor freshly cleaned:


The wood floor is so damaged that it doesn't ever look clean.  There are holes and marks and unidentified spots (paint?) that make the floor look like it still needs serious attention.

The same is true for our kitchen cabinets.  They used to be white but have faded to a gross off-white color.  There are scratches and chips in the paint that make it look like the cabinet doors need to be cleaned off.  I do actually wipe all the cabinet doors fairly regularly, but I'm the only person who knows the difference between the dirty doors and the clean doors.

And remember how I mentioned that I super duper cleaned the stove?  Well, this is what it looks like now:


Do you see all those black spots on the burner grates and burner covers?


This is literally about as good as these get.  I have tried nearly everything.  I've let them soak in hot soapy water for hours.  I've scrubbed them with every cleaner I have.  One time I thought I was a genius because I sprayed oven cleaner on them.  I figured if it can clean off burned-on food from my oven it could clean these burner grates.  Wrong.

I still want to try this "miracle cleaner" to clean them.  Or maybe even see if I can find this stuff.

So you can see why I often think, "What's the point of cleaning this?  It'll just look the same."  Not that that's the right attitude, but it's just what I naturally think.

Right now my Bible study group is studying the book Unglued by Lysa TerKeurst.  It's an excellent book.  In an early chapter of the book, Lysa shares how she got frustrated with herself for having such a messy closet.  She always labeled herself as a messy person.  Until she realized that was a lie.  She just needed some help to tackle that area of her life.

So I realized that I daily tell myself that I'm such a horrible house keeper.  It's part of my job.  My job is my kids and my house, and look at what a poor job I'm doing.

Lies.  All lies.

The truth is:  I am doing the best that I can.  I may need to ask for help from friends who are naturally more inclined to clean (you know who you are) or who know some good tricks to cleaning house.  I also have to realize that there are little people in my house working against me.  And there are three of them and only one of me.  Plus my priorities are different from people whose houses are cleaner.  When I do have pockets of "free" time, I usually use it to do craft projects for friends, make stuff for my kids, and work on homemade Christmas gifts.  I also use little bits of time to prepare lessons for my Sunday school class and work on my Bible study homework.  I could move cleaning up on my priority list, but only if I'm willing to move something else down. 

Since we are not great at cleaning by nature, we have had some cleaning mishaps in our house.  A few years ago, one of the kids accidentally wrote on our leather couch with a pen.  Jared thought he would clean it right off with some nail polish remover.  

This is what resulted:


It removed the ink alright.  Along with the color on the leather.

Well, I think Jared is finally off the hook for that move.  Because today I did something worse.

As I said before, I vacuumed every square inch of our house today.  I vacuumed along the ceiling perimeter of every room (where the wall meets the ceiling) so I could eliminate any cob webs.  In our family room, there is a window high above the couch.  I was stretching the vacuum hose to clean the ceiling above the couch, and I also wanted to clean out the dust (and a dead fly) from the window.

So I lifted the entire vacuum up onto the couch to increase the reach of the hose.  It worked like a charm, and I got the entire window clean.  What I didn't realize was that even though I was just using the hose attachment, the main brushes on the vacuum continued to spin.

When I finished cleaning the window and ceiling and removed the vacuum from the couch, this is what I revealed:


The friction of the spinning brushes actually rubbed the color off the leather.  Sweet Griffin ran and got a wet wipe and tried to wipe the marks off for me.  Unfortunately, the color is permanently worn off.  Griffin said, "Mom, now no one will ever want to buy this house from us."  I told him that fortunately/unfortunately, we are taking the couch with us whenever we move.

This is what I get for trying to clean thoroughly.  A permanent reminder that I'm seriously lacking in housekeeping skills. 

I suddenly can't remember what I'm supposed to tell myself when all I can think is "I'm a bad housekeeper."  

So, if anyone has any bright ideas for matching the tan of the leather and filling in the color, I'm all ears.  And if you'd like to offer free cleaning services, I'm open to that too.  My vacuum and back need a rest anyway.

Jessica

Friday, August 3, 2012

Dirty Laundry

I'm about to air my dirty laundry on the internet.

Literally.

When I'm doing some normal everyday task, I often wonder, "How does everyone else do this?"  Sorting dirty laundry is one of those tasks.  It took us a long time to come up with a system that works for us.

This might be a weird thing to share on the internet, but it would have been helpful to me to see how other people sort their laundry to give me ideas for our little system.

Keep in mind:
  1. We have five people in our family.  Kids clothes are smaller, but it seems like they each go through several outfits per day.  Each kid also adds to the number of bath towels, hand towels, sheets, blankets, etc. that need to be washed.
  2. Our washer, dryer, and dirty laundry bins are all downstairs in our creepy, gross, unfinished basement.  Try not to be frightened by the photos.
Ok, so we have a laundry basket in our closet for collecting our dirty clothes.  The kids put their dirty clothes down the laundry chute, which is located in our bathroom and the clothes drop down to the basement.

Once the dirty laundry is down in the basement, we sort it by color.  We bought hampers at Target a couple years ago, and we started figuring out which colors to put in each bin.

Here's what our dirty laundry area looks like:


The color bins are as follows:  bleach white, non-bleach white, blue (x2), green and gray, red and pink (x2), and yellow/orange/brown.  Purple clothes go into either blues or reds/pinks, depending on the shade or which bin has more room.  There's also an unlabeled bin that is used as overflow if one color gets out of control.

To be completely honest, this is actually what our bins looked like just before I gave them a mini-makeover:

  
The old labels were printed on cardstock, and I used clear packing tape to attach the labels to the hampers and also protect the labels somewhat.  Over time, some of the labels curled and one smeared from wet clothes being up against the ink on the label.

I peeled off the old labels and took all the hampers outside.  Dust and lint had collected in the bottoms, so I used my hose and a scrubbing brush to clean them out.  Once they were dry, they were ready for their new labels.

I used Microsoft Word to create the labels.  If you know me at all, then you know I loved choosing the fonts and colors.

I printed four labels per sheet (on cardstock) and cut them apart.  Then I fired up my handy dandy laminator. 


Sidenote:  the warnings on the top of the laminator crack me up:


I cut around each laminated label and used clear packing tape to attach the new labels to the newly cleaned hampers.


When one of the hampers is full, we simply lift it out of the little hamper grid, take it over to the washer (to the left of this photo), and load the laundry into the washer.

This system works well for us.  We've tried various layouts for the hampers and different ways of separating our laundry, but this seems to be the best fit so far. 

I know it probably seems absurd to many people that I wrote a whole post about how I sort my dirty laundry.  I'm just curious how other people do mundane tasks such as this.  I'd love to hear if any of you have different methods/systems for sorting laundry.

Is there a task that makes you wonder "How does everyone else do this?"?

Jessica
P.S.  If you would like me to email you my Word document of labels (completely customizable), simply leave me a comment with your email address.

Wednesday, March 21, 2012

Thank You, Walmart

I got to run out to Walmart by myself this morning.  {Isn't it funny that I enjoy Walmart just because I don't have to corral my three kids while I'm there?}

I got lots of the usuals, but I also scored a couple of fun things.  Do you remember my discussion on cute cleaning gloves?  Well, I found these beauties at Walmart for $2.88!
They were on a special display near the dish soap.  Now I don't have to pressure myself to make some. :)

I also previously shared that I am really wanting some Easter candy.  It's everywhere I go.  It taunts me.  One of my many favorites is Cadbury Creme Eggs.  I thought these mini creme eggs would be a nice way to have a treat without going overboard:
This way, I can eat one (or four) without wrecking all my hard work.  I haven't tried them yet, so we'll have to see if they're as delicious as the real deal.

And the final thing I got at Walmart was an injury.  I was just walking along, smiling and humming, when my flip-flop slid on a mysterious brown liquid that I didn't see until it was too late.  My whole right leg flew off in some crazy direction, and I hurt a muscle in my lower back.  {Sigh.}  Just one of those things that tries to steal my joy.  I won't let it though.

UPDATE:  I tried the mini eggs, and they're delicious!  One mini egg only has 40 calories, 1.5 g of fat, 6.3 g total carbohydrates (5.3 g sugars), and 0.5 g protein.  Not too bad for some chocolatey, oooey gooey yumminess!

Jessica

Wednesday, March 7, 2012

Two Birds, One Stone

Sometimes my house is so disgusting that it makes me crabby.  But even at those times, it's hard to find the time and energy to clean.  Especially while I'm overloaded making Easter Genies.

Another thing I've been neglecting:  my hands.  My hands are so stinking dry that they are also annoying me.  I wash them about a trillion times per day, and I only lotion them at night right before I go to bed.

So, I decided to try to knock out these two {annoying} birds with one stone.

I slathered on some Aquaphor and Eucerin (yes, at the same time) on my hands and then slipped on my cleaning gloves.  They're just the basic yellow latex gloves.  Then I tackled our disgusting bathroom.  Pandora kept me company while I cleaned.

After about 30 minutes, I had a sparkling clean bathroom and soft hands!  I'm sure I'm not the first person to think of this trick, but it might come in handy if you haven't tried it.

When I cleaned my gloves and put them away {yes, I clean my cleaning gloves...like Monica cleaning her vacuum on Friends}, I looked at just how ugly they are.  I know I've heard of cute cleaning gloves, so I (of course), hopped on Google.

I found some super cute cleaning gloves!  They are available on several websites.  Here are my favorites:


Now I'm torn between purchasing one of these adorable options and that constant constant thought that holds me back:  I could make those myself.

We'll see what I end up doing.  For now, since it's been a full 24 hours since I tackled the bathroom, it's time to clean again.
Jessica